สมัครเรียนโทร. 085-350-7540 , 084-88-00-255 , ntprintf@gmail.com

Python

สร้าง Web Application โดยใช้ Django และ Deploy บน AWS EC2 PYTHON Tutorial Python Getting Started Python Syntax Python Comments Python Variables Python Data Types Python Numbers Python Casting Python Strings Python Booleans Python Operators Python Lists Python Tuples Python Sets Python Dictionaries Python If ... Else Python While Loops Python For Loops Python Functions Python Lambda Python Arrays Python Classes and Objects Python Inheritance Python Iterators Python Scope Python Modules Python Datetime Python JSON Python RegEx Python PIP Python Try Except Python User Input Python File Open Python String Formatting Python File Open Python File Write/Create File Python Delete File Poisson Distribution Random Numbers in NumPy Chi Square Distribution Exponential Distribution Rayleigh Distribution Pareto Distribution Zipf Distribution Random Permutations Seaborn Normal (Gaussian) Distribution Binomial Distribution Logistic Distribution Multinomial Distribution NumPy Splitting Array NumPy ufuncs Uniform Distribution NumPy Introduction NumPy Getting Started NumPy Array Indexing NumPy Array Slicing NumPy Data Types NumPy Array Copy vs View NumPy Array Shape NumPy Array Reshaping NumPy Array Iterating NumPy Joining Array NumPy Searching Arrays NumPy Sorting Arrays NumPy Filter Array NumPy Trigonometric Functions NumPy Hyperbolic Functions NumPy Set Operations Create Your Own ufunc Simple Arithmetic Rounding Decimals NumPy Logs NumPy Summations NumPy Products NumPy Differences NumPy LCM Lowest Common Multiple NumPy GCD Greatest Common Denominator Machine Learning Machine Learning - Mean Median Mode Machine Learning - Standard Deviation Machine Learning - Percentiles Machine Learning - Data Distribution Machine Learning - Normal Data Distribution Machine Learning - Scatter Plot Machine Learning - Linear Regression Machine Learning - Multiple Regression Machine Learning - Polynomial Regression Machine Learning - Scale Machine Learning - Train/Test Machine Learning - Decision Tree Python MySQL Python MySQL Create Database Python MySQL Create Table Python MySQL Insert Into Table Python MySQL Select From Python MySQL Where Python MySQL Order By Python MySQL Delete From By Python MySQL Drop Table Python MySQL Update Table Python MySQL Limit Python MySQL Join Python MongoDB Python MongoDB Create Database Python MongoDB Create Database Python MongoDB Create Collection Python MongoDB Insert Document Python MongoDB Find Python MongoDB Query Python MongoDB Sort Python MongoDB Delete Document Python MongoDB Drop Collection Python MongoDB Update Python MongoDB Limit Python Built in Functions Python String Methods Python List/Array Methods Python Dictionary Methods Python Tuple Methods Python Set Methods Python File Methods Python Keywords Python Built-in Exceptions Python Random Module Python math Module Python Requests Module Python cmath Module How to Remove Duplicates From a Python List How to Reverse a String in Python How to Add Two Numbers in Python Random Data Distribution การใช้งาน Python ในการสร้างและจัดการข้อมูลด้วย Linked List เทคนิคการเพิ่มประสิทธิภาพของ Linked List ในภาษา Python การใช้งาน Python เพื่อการสร้างและจัดการ Doubly Linked List อย่างมีประสิทธิภาพ ปรับปรุงโครงสร้างข้อมูลของคุณด้วย Doubly Linked Lists ในภาษา Python เทคนิคการเขียนโค้ดเพื่อการจัดการข้อมูลแบบไดนามิคใน Python ผ่าน Linked List เทคนิคการเขียนโค้ดเพื่อการจัดการข้อมูลแบบไดนามิคใน Python ผ่าน Doubly Linked List เทคนิคการเขียนโค้ดเพื่อการจัดการข้อมูลแบบไดนามิคใน Python ผ่าน Double Ended Queue เทคนิคการเขียนโค้ดเพื่อการจัดการข้อมูลแบบไดนามิคใน Python ผ่าน ArrayList เทคนิคการเขียนโค้ดเพื่อการจัดการข้อมูลแบบไดนามิคใน Python ผ่าน Queue เทคนิคการเขียนโค้ดเพื่อการจัดการข้อมูลแบบไดนามิคใน Python ผ่าน Stack เทคนิคการเขียนโค้ดเพื่อการจัดการข้อมูลแบบไดนามิคใน Python ผ่าน Tree เทคนิคการเขียนโค้ดเพื่อการจัดการข้อมูลแบบไดนามิคใน Python ผ่าน Binary Search Tree เทคนิคการเขียนโค้ดเพื่อการจัดการข้อมูลแบบไดนามิคใน Python ผ่าน AVL Tree เทคนิคการเขียนโค้ดเพื่อการจัดการข้อมูลแบบไดนามิคใน Python ผ่าน Self-Balancing Tree เทคนิคการเขียนโค้ดเพื่อการจัดการข้อมูลแบบไดนามิคใน Python ผ่าน Heap เทคนิคการเขียนโค้ดเพื่อการจัดการข้อมูลแบบไดนามิคใน Python ผ่าน Hash เทคนิคการเขียนโค้ดเพื่อการจัดการข้อมูลแบบไดนามิคใน Python ผ่าน Priority Queue เทคนิคการเขียนโค้ดเพื่อการจัดการข้อมูลแบบไดนามิคใน Python ผ่าน Seperate Chaining Hashing เทคนิคการเขียนโค้ดเพื่อการจัดการข้อมูลแบบไดนามิคใน Python ผ่าน Linear Probing Hashing เทคนิคการเขียนโค้ดเพื่อการจัดการข้อมูลแบบไดนามิคใน Python ผ่าน Quadratic Probing Hashing เทคนิคการเขียนโค้ดเพื่อการจัดการข้อมูลแบบไดนามิคใน Python ผ่าน Red-Black Tree เทคนิคการเขียนโค้ดเพื่อการจัดการข้อมูลแบบไดนามิคใน Python ผ่าน Sisjoint Set เทคนิคการเขียนโค้ดเพื่อการจัดการข้อมูลแบบไดนามิคใน Python ผ่าน Set วิเคราะห์อัลกอริทึมของจิตรา (Dijkstra Algorithm) ผ่านภาษา Python ความลับของ Bellman-Ford Algorithm และการประยุกต์ใช้ในโลกของไพธอน กรีดี้ อัลกอริทึม: กลยุทธ์การเขียนโปรแกรมที่มุ่งหวังผลทันทีในภาษา Python Dynamic Programming คือกุญแจสู่การแก้ไขปัญหาที่ซับซ้อนด้วย Python การทำความเข้าใจกับ Divide and Conquer: กลวิธีการโปรแกรมที่ เปลี่ยนโจทย์ใหญ่ให้เป็นเรื่องง่าย การใช้ Memorization ในการเพิ่มประสิทธิภาพของการเขียนโปรแกรมด้วย Python breadth first search in Python ลึกล้ำกับการค้นหา Depth First Search ในโลกแห่งข้อมูล เบื้องหลังการค้นหาคำตอบด้วย Backtracking และการประยุกต์ใช้ใน Python การตีแผ่ปัญญาของการค้นหาด้วย Branch and Bound Algorithm การค้นหาในพื้นที่สถานะ (State Space Search) ด้วย Python: การแก้ปัญหาอย่างชาญฉลาด Permutation in Python การแบ่งกลุ่มข้อมูลด้วย Set Partition ใน Python - การแก้ปัญหาแบบคลาสสิกในโลก IT การค้นหาเชิงเส้น (Linear Search) ในโลกของ Python และการประยุกต์ใช้ในชีวิตจริง Binary Search in Python Generating All Subsets Using Brute Force: ความจำเป็นของการค้นหาย่อยชุด การใช้งาน Brute Force ผ่านภาษา Python และการประยุกต์ใช้ในโลกแห่งการแก้ปัญหา การแก้ปัญหา 8 Queens Problem ด้วยภาษา Python Knights Tour Problem in Python Travelling Salesman Problem in Python String Matching Algorithm และการใช้งานใน Python Finding Articulation Points (จุดยึด) ใน Graphs ด้วย Python Minimum Spanning Tree และการประยุกต์ใช้ใน Python Minimum Cost Flow Algorithm: อัลกอริธึมที่ค้นหาการไหลของต้นทุนต่ำสุด ปลดล็อคความลับของ CLIQUE Algorithm ด้วยภาษา Python การใช้งาน Sum of Products Algorithm เพื่อการคำนวณที่มีประสิทธิภาพด้วย Python วิเคราะห์ลึกถึง A* Algorithm ทางเลือกของการค้นหาที่มีประสิทธิภาพสูง The Perfect Matching - The Hungarian Method ในภาษา Python ปัญหารินน้ำในโลกโปรแกรมมิ่ง กับ Ford-Fulkerson Algorithm B* Algorithm in Python คู่มือการใช้งาน D* Algorithm ใน Python พร้อมเคล็ดลับในการใช้งาน F* Algorithm - การรวมสองอาร์เรย์โดยใช้ Python Minimax Algorithm ในเกมหมากรุกของคิดและตัดสิน: อาวุธลับของ AI Gaussian Elimination กับการแก้ระบบสมการเชิงเส้นใน Python Randomized Algorithm in Python อัลกอริทึม Monte Carlo กับการใช้งานใน Python Newtons Method in Python ทำความเข้าใจ Mullers Method ทางออกสำหรับการแก้สมการโดยใช้ Python สำรวจ RANSAC ผ่านภาษา Python ประสิทธิภาพของ Particle Filter ในการประมวลผลข้อมูล: การวิเคราะห์อัลกอริทึมด้วย Python Las Vegas Algorithm คืออะไร? ความรวดเร็วแห่งการเรียงลำดับด้วย Quick Sort ในภาษา Python การเรียงลำดับด้วยวิธี Selection Sort และการใช้งานในภาษา Python อัลกอริทึม Bubble Sort: วิธีการเรียงลำดับข้อมูลใน Python Insertion Sort in Python การเรียงลำดับข้อมูลด้วย Merge Sort ใน Python และการใช้งานในโลกจริง แผนภูมิวอร์โนอี: สัมผัสคณิตศาสตร์และโปรแกรมมิ่ง ตัวแปร หรือ Variable คืออะไร การใช้งาน ตัวแปร หรือ Variable ในภาษา Python แบบง่ายๆ พร้อมตัวอย่าง ตัวแปรแบบ string คืออะไร การใช้งาน ตัวแปรแบบ string ในภาษา Python แบบง่ายๆ พร้อมตัวอย่าง ตัวแปรแบบจำนวนเต็ม หรือ integer คืออะไร การใช้งาน ตัวแปรแบบจำนวนเต็ม หรือ integer ในภาษา Python แบบง่ายๆ พร้อมตัวอย่าง numberic variable คืออะไร การใช้งาน numberic variable ในภาษา Python แบบง่ายๆ พร้อมตัวอย่าง string variable คืออะไร การใช้งาน string variable ในภาษา Python แบบง่ายๆ พร้อมตัวอย่าง if-else คืออะไร การใช้งาน if-else ในภาษา Python แบบง่ายๆ พร้อมตัวอย่าง if statement คืออะไร การใช้งาน if statement ในภาษา Python แบบง่ายๆ พร้อมตัวอย่าง nested if-else คืออะไร การใช้งาน nested if-else ในภาษา Python แบบง่ายๆ พร้อมตัวอย่าง for loop คืออะไร การใช้งาน for loop ในภาษา Python แบบง่ายๆ พร้อมตัวอย่าง while loop คืออะไร การใช้งาน while loop ในภาษา Python แบบง่ายๆ พร้อมตัวอย่าง do-while loop คืออะไร การใช้งาน do-while loop ในภาษา Python แบบง่ายๆ พร้อมตัวอย่าง foreach loop คืออะไร การใช้งาน foreach loop ในภาษา Python แบบง่ายๆ พร้อมตัวอย่าง sequencial search คืออะไร การใช้งาน sequencial search ในภาษา Python แบบง่ายๆ พร้อมตัวอย่าง การหาค่ามากที่สุด และน้อยที่สุด โดยใช้ Loop คืออะไร การใช้งาน การหาค่ามากที่สุด และน้อยที่สุด โดยใช้ Loop ในภาษา Python แบบง่ายๆ พร้อมตัวอย่าง recursive function คืออะไร การใช้งาน recursive function ในภาษา Python แบบง่ายๆ พร้อมตัวอย่าง try-catch คืออะไร การใช้งาน try-catch ในภาษา Python แบบง่ายๆ พร้อมตัวอย่าง loop คืออะไร การใช้งาน loop ในภาษา Python แบบง่ายๆ พร้อมตัวอย่าง nested loop คืออะไร การใช้งาน nested loop ในภาษา Python แบบง่ายๆ พร้อมตัวอย่าง loop and if-else inside loop คืออะไร การใช้งาน loop and if-else inside loop ในภาษา Python แบบง่ายๆ พร้อมตัวอย่าง math function sqrt sin cos tan คืออะไร การใช้งาน math function sqrt sin cos tan ในภาษา Python แบบง่ายๆ พร้อมตัวอย่าง for each คืออะไร การใช้งาน for each ในภาษา Python แบบง่ายๆ พร้อมตัวอย่าง dynamic typing variable คืออะไร การใช้งาน dynamic typing variable ในภาษา Python แบบง่ายๆ พร้อมตัวอย่าง function คืออะไร การใช้งาน function ในภาษา Python แบบง่ายๆ พร้อมตัวอย่าง return value from function คืออะไร การใช้งาน return value from function ในภาษา Python แบบง่ายๆ พร้อมตัวอย่าง parameter of function คืออะไร การใช้งาน parameter of function ในภาษา Python แบบง่ายๆ พร้อมตัวอย่าง sending function as variable คืออะไร การใช้งาน sending function as variable ในภาษา Python แบบง่ายๆ พร้อมตัวอย่าง array คืออะไร การใช้งาน array ในภาษา Python แบบง่ายๆ พร้อมตัวอย่าง array 2d คืออะไร การใช้งาน array 2d ในภาษา Python แบบง่ายๆ พร้อมตัวอย่าง dynamic array คืออะไร การใช้งาน dynamic array ในภาษา Python แบบง่ายๆ พร้อมตัวอย่าง OOP object oriented programming คืออะไร การใช้งาน OOP object oriented programming ในภาษา Python แบบง่ายๆ พร้อมตัวอย่าง class and instance คืออะไร การใช้งาน class and instance ในภาษา Python แบบง่ายๆ พร้อมตัวอย่าง calling instance function คืออะไร การใช้งาน calling instance function ในภาษา Python แบบง่ายๆ พร้อมตัวอย่าง constructor คืออะไร การใช้งาน constructor ในภาษา Python แบบง่ายๆ พร้อมตัวอย่าง set and get function and OOP concept คืออะไร การใช้งาน set and get function and OOP concept ในภาษา Python แบบง่ายๆ พร้อมตัวอย่าง encapsulation in OOP concept คืออะไร การใช้งาน encapsulation in OOP concept ในภาษา Python แบบง่ายๆ พร้อมตัวอย่าง polymorphism in OOP concept คืออะไร การใช้งาน polymorphism in OOP concept ในภาษา Python แบบง่ายๆ พร้อมตัวอย่าง accesibility in OOP concept คืออะไร การใช้งาน accesibility in OOP concept ในภาษา Python แบบง่ายๆ พร้อมตัวอย่าง inheritance in OOP concept คืออะไร การใช้งาน inheritance in OOP concept ในภาษา Python แบบง่ายๆ พร้อมตัวอย่าง multiple inheritance in OOP concept คืออะไร การใช้งาน multiple inheritance in OOP concept ในภาษา Python แบบง่ายๆ พร้อมตัวอย่าง useful function of string คืออะไร การใช้งาน useful function of string ในภาษา Python แบบง่ายๆ พร้อมตัวอย่าง useful function of array คืออะไร การใช้งาน useful function of array ในภาษา Python แบบง่ายๆ พร้อมตัวอย่าง file คืออะไร การใช้งาน file ในภาษา Python แบบง่ายๆ พร้อมตัวอย่าง read file คืออะไร การใช้งาน read file ในภาษา Python แบบง่ายๆ พร้อมตัวอย่าง write file คืออะไร การใช้งาน write file ในภาษา Python แบบง่ายๆ พร้อมตัวอย่าง append file คืออะไร การใช้งาน append file ในภาษา Python แบบง่ายๆ พร้อมตัวอย่าง การใช้งาน static method ในภาษา Python แบบง่ายๆ พร้อมตัวอย่าง การใช้งาน create simple game ในภาษา Python แบบง่ายๆ พร้อมตัวอย่าง การใช้งาน generic and generic collection ในภาษา Python แบบง่ายๆ พร้อมตัวอย่าง การใช้งาน Read binary file ในภาษา Python แบบง่ายๆ พร้อมตัวอย่าง การใช้งาน Write binary file ในภาษา Python แบบง่ายๆ พร้อมตัวอย่าง การใช้งาน Export data to json ในภาษา Python แบบง่ายๆ พร้อมตัวอย่าง การใช้งาน Export data to XML ในภาษา Python แบบง่ายๆ พร้อมตัวอย่าง การใช้งาน Append binary file ในภาษา Python แบบง่ายๆ พร้อมตัวอย่าง การใช้งาน Create simple question and answer program ในภาษา Python แบบง่ายๆ พร้อมตัวอย่าง การใช้งาน List ในภาษา Python แบบง่ายๆ พร้อมตัวอย่าง การใช้งาน Map ในภาษา Python แบบง่ายๆ พร้อมตัวอย่าง การใช้งาน Set ในภาษา Python แบบง่ายๆ พร้อมตัวอย่าง การใช้งาน Math abs ในภาษา Python แบบง่ายๆ พร้อมตัวอย่าง การใช้งาน Math atan2 ในภาษา Python แบบง่ายๆ พร้อมตัวอย่าง การใช้งาน Dictionary ในภาษา Python แบบง่ายๆ พร้อมตัวอย่าง การใช้งาน Multi-Thread ในภาษา Python แบบง่ายๆ พร้อมตัวอย่าง การใช้งาน Asynchronous programming ในภาษา Python แบบง่ายๆ พร้อมตัวอย่าง การใช้งาน Functional programming ในภาษา Python แบบง่ายๆ พร้อมตัวอย่าง การใช้งาน Class and object ในภาษา Python แบบง่ายๆ พร้อมตัวอย่าง การใช้งาน Operator ในภาษา Python แบบง่ายๆ พร้อมตัวอย่าง การใช้งาน Operator precedence ในภาษา Python แบบง่ายๆ พร้อมตัวอย่าง การใช้งาน Comparison operator ในภาษา Python แบบง่ายๆ พร้อมตัวอย่าง การใช้งาน Bitwise operator ในภาษา Python แบบง่ายๆ พร้อมตัวอย่าง การใช้งาน Approximation sine by Taylor series ในภาษา Python แบบง่ายๆ พร้อมตัวอย่าง การใช้งาน Approximation Factorial for large number by Stirlings approximation ในภาษา Python แบบง่ายๆ พร้อมตัวอย่าง การใช้งาน Longest common subsequent ในภาษา Python แบบง่ายๆ พร้อมตัวอย่าง การใช้งาน Is it Palindrome ในภาษา Python แบบง่ายๆ พร้อมตัวอย่าง การใช้งาน Longest palindrome in string ในภาษา Python แบบง่ายๆ พร้อมตัวอย่าง การใช้งาน Is number that have been input , palindrome ในภาษา Python แบบง่ายๆ พร้อมตัวอย่าง การใช้งาน String substring ในภาษา Python แบบง่ายๆ พร้อมตัวอย่าง การใช้งาน String join ในภาษา Python แบบง่ายๆ พร้อมตัวอย่าง การใช้งาน String split ในภาษา Python แบบง่ายๆ พร้อมตัวอย่าง การใช้งาน String indexOf ในภาษา Python แบบง่ายๆ พร้อมตัวอย่าง การใช้งาน String trim ในภาษา Python แบบง่ายๆ พร้อมตัวอย่าง การใช้งาน String compare ในภาษา Python แบบง่ายๆ พร้อมตัวอย่าง การใช้งาน String last index of ในภาษา Python แบบง่ายๆ พร้อมตัวอย่าง การใช้งาน Integration a function by mid-point approximation algorithm ในภาษา Python แบบง่ายๆ พร้อมตัวอย่าง การใช้งาน Integrate a function by trapezoidal integration algorithm ในภาษา Python แบบง่ายๆ พร้อมตัวอย่าง การใช้งาน find leap year ในภาษา Python แบบง่ายๆ พร้อมตัวอย่าง การใช้งาน Finding day of year ในภาษา Python แบบง่ายๆ พร้อมตัวอย่าง การใช้งาน Catalang number generator ในภาษา Python แบบง่ายๆ พร้อมตัวอย่าง การใช้งาน Finding summation of nested list by recursive function ในภาษา Python แบบง่ายๆ พร้อมตัวอย่าง การใช้งาน Fastest power calculation (case power number is integer) using Exponentiation by squaring ในภาษา Python แบบง่ายๆ พร้อมตัวอย่าง การใช้งาน Logical operator ในภาษา Python แบบง่ายๆ พร้อมตัวอย่าง การใช้งาน Keywords and reserved words ในภาษา Python แบบง่ายๆ พร้อมตัวอย่าง การใช้งาน Finding maximum from array ในภาษา Python แบบง่ายๆ พร้อมตัวอย่าง การใช้งาน Finding minimum from array ในภาษา Python แบบง่ายๆ พร้อมตัวอย่าง การใช้งาน Sum all element in array ในภาษา Python แบบง่ายๆ พร้อมตัวอย่าง การใช้งาน Average from all element in array ในภาษา Python แบบง่ายๆ พร้อมตัวอย่าง การใช้งาน Filter element in array ในภาษา Python แบบง่ายๆ พร้อมตัวอย่าง การใช้งาน Accumulating from array ในภาษา Python แบบง่ายๆ พร้อมตัวอย่าง การใช้งาน square all element in array and store to another array ในภาษา Python แบบง่ายๆ พร้อมตัวอย่าง การใช้งาน MySQL insert data to table using prepared statement ในภาษา Python แบบง่ายๆ พร้อมตัวอย่าง การใช้งาน MySQL select data from table using prepared statement ในภาษา Python แบบง่ายๆ พร้อมตัวอย่าง การใช้งาน MySQL update data from table using prepared statement ในภาษา Python แบบง่ายๆ พร้อมตัวอย่าง การใช้งาน MySQL delete a row from table ในภาษา Python แบบง่ายๆ พร้อมตัวอย่าง การใช้งาน MySQL create table ในภาษา Python แบบง่ายๆ พร้อมตัวอย่าง การใช้งาน Postgresql create a table step by step ในภาษา Python แบบง่ายๆ พร้อมตัวอย่าง การใช้งาน PostgreSQL insert to table using prepared statement ในภาษา Python แบบง่ายๆ พร้อมตัวอย่าง การใช้งาน PostgreSQL select from table using prepared statement ในภาษา Python แบบง่ายๆ พร้อมตัวอย่าง การใช้งาน PostgreSQL update table using prepared statement ในภาษา Python แบบง่ายๆ พร้อมตัวอย่าง การใช้งาน PostgreSQL delete a row in table using prepared statement ในภาษา Python แบบง่ายๆ พร้อมตัวอย่าง การใช้งาน Linear regression ในภาษา Python แบบง่ายๆ พร้อมตัวอย่าง การใช้งาน Quadratic regression ในภาษา Python แบบง่ายๆ พร้อมตัวอย่าง การใช้งาน Graph fiitting ในภาษา Python แบบง่ายๆ พร้อมตัวอย่าง การใช้งาน Implement perceptron ในภาษา Python แบบง่ายๆ พร้อมตัวอย่าง การใช้งาน Implement neural network 2 layers ในภาษา Python แบบง่ายๆ พร้อมตัวอย่าง การใช้งาน K-NN algorithm ในภาษา Python แบบง่ายๆ พร้อมตัวอย่าง การใช้งาน Decision Tree algorithm ในภาษา Python แบบง่ายๆ พร้อมตัวอย่าง การใช้งาน Http request using get method ในภาษา Python แบบง่ายๆ พร้อมตัวอย่าง การใช้งาน Http request using post method passing by JSON ในภาษา Python แบบง่ายๆ พร้อมตัวอย่าง การใช้งาน Web server waiting for http request ในภาษา Python แบบง่ายๆ พร้อมตัวอย่าง การใช้งาน Using CURL ในภาษา Python แบบง่ายๆ พร้อมตัวอย่าง การใช้งาน OpenCV ในภาษา Python แบบง่ายๆ พร้อมตัวอย่าง การใช้งาน OpenGL ในภาษา Python แบบง่ายๆ พร้อมตัวอย่าง การใช้งาน GUI create a form ในภาษา Python แบบง่ายๆ พร้อมตัวอย่าง การใช้งาน GUI create a button and waiting for click event ในภาษา Python แบบง่ายๆ พร้อมตัวอย่าง การใช้งาน GUI create a textBox and waiting for text change event ในภาษา Python แบบง่ายๆ พร้อมตัวอย่าง การใช้งาน GUI create combo box and waiting for selected change ในภาษา Python แบบง่ายๆ พร้อมตัวอย่าง การใช้งาน GUI create Scoll pane ในภาษา Python แบบง่ายๆ พร้อมตัวอย่าง การใช้งาน GUI create ListBox ในภาษา Python แบบง่ายๆ พร้อมตัวอย่าง การใช้งาน GUI create PictureBox ในภาษา Python แบบง่ายๆ พร้อมตัวอย่าง การใช้งาน GUI create Data Table ในภาษา Python แบบง่ายๆ พร้อมตัวอย่าง การใช้งาน GUI create RichTextBox Multiline ในภาษา Python แบบง่ายๆ พร้อมตัวอย่าง การใช้งาน GUI create new Windows ในภาษา Python แบบง่ายๆ พร้อมตัวอย่าง การใช้งาน GUI create menubar ในภาษา Python แบบง่ายๆ พร้อมตัวอย่าง การใช้งาน GUI create Label ในภาษา Python แบบง่ายๆ พร้อมตัวอย่าง การใช้งาน GUI drawing colorful Rabbit ในภาษา Python แบบง่ายๆ พร้อมตัวอย่าง การใช้งาน GUI drawing colorful Cat ในภาษา Python แบบง่ายๆ พร้อมตัวอย่าง การใช้งาน Create pie chart from data ในภาษา Python แบบง่ายๆ พร้อมตัวอย่าง การใช้งาน Create bar chart from data ในภาษา Python แบบง่ายๆ พร้อมตัวอย่าง การใช้งาน Line chart from data ในภาษา Python แบบง่ายๆ พร้อมตัวอย่าง การใช้งาน Show data table ในภาษา Python แบบง่ายๆ พร้อมตัวอย่าง การใช้งาน SHA-256 hash algorithm ในภาษา Python แบบง่ายๆ พร้อมตัวอย่าง การใช้งาน MD-5 hash algorithm ในภาษา Python แบบง่ายๆ พร้อมตัวอย่าง การใช้งาน Printing data to printer ในภาษา Python แบบง่ายๆ พร้อมตัวอย่าง การใช้งาน Sending RS232 com port ในภาษา Python แบบง่ายๆ พร้อมตัวอย่าง การใช้งาน Reading from RS232 comport ในภาษา Python แบบง่ายๆ พร้อมตัวอย่าง การใช้งาน GUI drawing colorful tiger ในภาษา Python แบบง่ายๆ พร้อมตัวอย่าง การใช้งาน Drawing rabbit in native gui ในภาษา Python แบบง่ายๆ พร้อมตัวอย่าง การใช้งาน Drawing tiger in native gui ในภาษา Python แบบง่ายๆ พร้อมตัวอย่าง การใช้งาน Drawing Union Jack flag in native gui ในภาษา Python แบบง่ายๆ พร้อมตัวอย่าง การใช้งาน Drawing USA flag in native GUI ในภาษา Python แบบง่ายๆ พร้อมตัวอย่าง การใช้งาน Create OX game ในภาษา Python แบบง่ายๆ พร้อมตัวอย่าง การใช้งาน Create chess game ในภาษา Python แบบง่ายๆ พร้อมตัวอย่าง การใช้งาน Create ladder and snake game ในภาษา Python แบบง่ายๆ พร้อมตัวอย่าง การใช้งาน Create monopoly game ในภาษา Python แบบง่ายๆ พร้อมตัวอย่าง การใช้งาน Simple calculator ในภาษา Python แบบง่ายๆ พร้อมตัวอย่าง การใช้งาน Scientific calculator ในภาษา Python แบบง่ายๆ พร้อมตัวอย่าง การใช้งาน create your own Linked List from scratch without using lib ในภาษา Python แบบง่ายๆ พร้อมตัวอย่าง การใช้งาน create your own Doubly Linked List from scratch without using lib ในภาษา Python แบบง่ายๆ พร้อมตัวอย่าง การใช้งาน create your own Double Ended Queue from scratch without using lib ในภาษา Python แบบง่ายๆ พร้อมตัวอย่าง การใช้งาน create your own ArrayList from scratch without using lib ในภาษา Python แบบง่ายๆ พร้อมตัวอย่าง การใช้งาน create your own Queue from scratch without using lib ในภาษา Python แบบง่ายๆ พร้อมตัวอย่าง การใช้งาน create your own Stack เองแบบไม่ใช้ lib เขียน pop, push , top ในภาษา Python แบบง่ายๆ พร้อมตัวอย่าง การใช้งาน create your own Tree เองแบบไม่ใช้ lib , insert tree ในภาษา Python แบบง่ายๆ พร้อมตัวอย่าง การใช้งาน create your own Binary Search Tree เองแบบไม่ใช้ lib , insert , find , delete ในภาษา Python แบบง่ายๆ พร้อมตัวอย่าง การใช้งาน create your own AVL Tree from scratch without using lib ในภาษา Python แบบง่ายๆ พร้อมตัวอย่าง การใช้งาน create your own Self-Balancing Tree from scratch without using lib ในภาษา Python แบบง่ายๆ พร้อมตัวอย่าง การใช้งาน create your own Heap from scratch without using lib ในภาษา Python แบบง่ายๆ พร้อมตัวอย่าง การใช้งาน create your own Hash from scratch without using lib ในภาษา Python แบบง่ายๆ พร้อมตัวอย่าง การใช้งาน create your own Priority Queue from scratch without using lib ในภาษา Python แบบง่ายๆ พร้อมตัวอย่าง การใช้งาน create your own Hash โดยใช้วิธี Seperate Chaining Hashing from scratch without using lib ในภาษา Python แบบง่ายๆ พร้อมตัวอย่าง การใช้งาน create your own Hash โดยใช้วิธี Linear Probing Hashing from scratch without using lib ในภาษา Python แบบง่ายๆ พร้อมตัวอย่าง การใช้งาน create your own Quadratic Probing Hashing from scratch without using lib ในภาษา Python แบบง่ายๆ พร้อมตัวอย่าง การใช้งาน create your own Map เองแบบไม่ใช้ lib , insert , find , delete ในภาษา Python แบบง่ายๆ พร้อมตัวอย่าง การใช้งาน create your own Set from scratch without using lib ในภาษา Python แบบง่ายๆ พร้อมตัวอย่าง การใช้งาน create your own directed graph เองแบบไม่ใช้ lib ใช้ matrix แทน adj ในภาษา Python แบบง่ายๆ พร้อมตัวอย่าง การใช้งาน create your own undirected graph เองแบบไม่ใช้ lib ใช้ matrix แทน adj ในภาษา Python แบบง่ายๆ พร้อมตัวอย่าง การใช้งาน create your own directed graph เองแบบไม่ใช้ lib ใช้ linked list เป็น Adj ในภาษา Python แบบง่ายๆ พร้อมตัวอย่าง การใช้งาน create your own undirected graph เองแบบไม่ใช้ lib using linked list เป็น Adj ในภาษา Python แบบง่ายๆ พร้อมตัวอย่าง การใช้งาน howto using interface in OOP ในภาษา Python แบบง่ายๆ พร้อมตัวอย่าง การใช้งาน Async ในภาษา Python แบบง่ายๆ พร้อมตัวอย่าง การใช้งาน Thread ในภาษา Python แบบง่ายๆ พร้อมตัวอย่าง การใช้งาน Multi-process ในภาษา Python แบบง่ายๆ พร้อมตัวอย่าง การใช้งาน return vs yeild ในภาษา Python แบบง่ายๆ พร้อมตัวอย่าง การใช้งาน serial port or comport write and read ในภาษา Python แบบง่ายๆ พร้อมตัวอย่าง การใช้งาน Parse JSON to object ในภาษา Python แบบง่ายๆ พร้อมตัวอย่าง การใช้งาน Parse JSON to array ในภาษา Python แบบง่ายๆ พร้อมตัวอย่าง การใช้งาน create mini web server ในภาษา Python แบบง่ายๆ พร้อมตัวอย่าง การใช้งาน web scraping ในภาษา Python แบบง่ายๆ พร้อมตัวอย่าง การใช้งาน calling API ในภาษา Python แบบง่ายๆ พร้อมตัวอย่าง การใช้งาน call API with access token ในภาษา Python แบบง่ายๆ พร้อมตัวอย่าง การเขียน Code MySQL CRUD โดยใช้ภาษา Python การเขียน Code NoSQL CRUD โดยใช้ภาษา Python การเขียน Code MongoDB โดยใช้ภาษา Python การเขียน Code Memcache CRUD โดยใช้ภาษา Python การเขียน Code Redis โดยใช้ภาษา Python Pandas Tutorials ตรวจจับตำแหน่งของมือจากกล้องเว็บแคมแบบเรียลไทม์ด้วย Python ง่าย ๆ ใน 2 นาที ตรวจจับวัตถุด้วย Python ใน 5 Steps ใช้ AI แบ่งส่วนภาพคนกับฉากหลังแบบง่าย ๆ แป๊บเดียวเสร็จ ใช้ AI บอกท่าทางคนด้วย Code เพียง 15 บรรทัด สร้างแอนิเมชันจากตัวการ์ตูนที่เราวาดเองด้วย Code 2 บรรทัด สร้างไฟล์ท่าเต้นสุดคิวท์ให้ตัวการ์ตูนเต้นตามใน 1 คำสั่ง Top 20 Python Machine Learning Open Source Projects

A41 - Create Web Application by Using Django and Deploy on AWS EC2

สร้างเว็บด้วย Django บน EC2 แบบง่าย ๆ


Django เป็นเฟรมเวิร์กยอดนิยมสำหรับพัฒนาเว็บแอปพลิเคชันด้วยภาษา Python สำหรับผู้ที่สนใจสามารถเรียนรู้เกี่ยวกับ Django และอ่าน Document ได้จากที่นี่ ในบทความนี้ ผู้เรียนจะได้ทดลองสร้างเว็บบล็อกแบบง่าย ๆ ด้วย Django บน Cloud ของ Amazon AWS โดยใช้ผลิตภัณฑ์ที่ชื่อว่า EC2 สำหรับผู้ที่ไม่มีพื้นฐานการเขียนโปรแกรมภาษา Python แต่สนใจอยากทำเว็บ ขอแนะนำคอร์ส Python + Web Programming (PHP101-PY) ของทาง EPT ที่คุ้มสุด ๆ เนื้อหาครอบคลุมเรื่องที่จำเป็นต้องรู้ในการเขียนโปรแกรมและทำเว็บทุกเรื่อง สอนละเอียดสุด ๆ สอนตั้งแต่ขั้นพื้นฐานจนเทพ มีเนื้อหากว่า 92 ชั่วโมง และมีหลักสูตรเทียบเท่าเรียนในมหาวิทยาลัยชั้นนำ 1-2 ปีครับ


สร้าง EC2 Instance และติดตั้ง Apache

สามารถอ่านขั้นตอนการสร้าง EC2 Instance ติดตั้ง Apache และ Package ที่จำเป็นสำหรับการใช้ Django ได้จากบทความ A40 - Create AWS EC2 instance


สร้าง Python Virtual Environment สำหรับ Django project

หลังจากสร้าง EC2 Instance พร้อมติดตั้ง Apache และ Package ที่จำเป็นแล้ว เราจะมาติดตั้ง Virtual environment และสร้างโครงเว็บใน Virtual environmentกัน

1. ไปที่หน้าต่าง PuTTY ที่เชื่อมต่อกับ EC2 Instance ที่สร้าง แล้วพิมพ์ command ต่อไปนี้และกด Enter ทีละ command เพื่อติดตั้ง virtualenv และสร้างโฟลเดอร์ชื่อ django แล้วเข้าไปในโฟลเดอร์นั้น 

sudo pip3 install virtualenv
mkdir django
cd django


2. สร้าง Python virtual environment ในโฟลเดอร์ django ด้วยคำสั่งต่อไปนี้ จะได้โฟลเดอร์ myenv เพิ่มขึ้นมา

virtualenv myenv


3.  Activate virtual environment ด้วยคำสั่งต่อไปนี้

source myenv/bin/activate


สังเกตว่าหลังจาก Activate แล้วเราจะอยู่ใน virtual environment (myenv)


4. ติดตั้ง django ภายใน virtual environment (myenv) ด้วยคำสั่งต่อไปนี้

pip install django


5. สร้างโฟลเดอร์ชื่อ django_test สำหรับเก็บ Project แล้วเข้าไปในโฟลเดอร์นั้นด้วยคำสั่งต่อไปนี้

mkdir django_test
cd django_test


6. สร้างโครงเว็บแบบอัตโนมัติพร้อม SQLite database ด้วยคำสั่งต่อไปนี้ 

django-admin startproject mysite


หลังสร้างแล้วจะได้โฟลเดอร์ mysite เพิ่มขึ้นมาแล้ว ซึ่งข้างในโฟลเดอร์ประกอบด้วย

mysite/
    manage.py
    mysite/
        __init__.py
        settings.py
        urls.py
        asgi.py
        wsgi.py


คำอธิบาย:

  • The outer mysite/ root directory is a container for your project. Its name doesn’t matter to Django; you can rename it to anything you like.
  • manage.py: A command-line utility that lets you interact with this Django project in various ways. You can read all the details about manage.py in django-admin and manage.py.
  • The inner mysite/ directory is the actual Python package for your project. Its name is the Python package name you’ll need to use to import anything inside it (e.g. mysite.urls).
  • mysite/__init__.py: An empty file that tells Python that this directory should be considered a Python package. If you’re a Python beginner, read more about packages in the official Python docs.
  • mysite/settings.py: Settings/configuration for this Django project. Django settings will tell you all about how settings work.
  • mysite/urls.py: The URL declarations for this Django project; a “table of contents” of your Django-powered site. You can read more about URLs in URL dispatcher.
  • mysite/asgi.py: An entry-point for ASGI-compatible web servers to serve your project. See How to deploy with ASGI for more details.
  • mysite/wsgi.py: An entry-point for WSGI-compatible web servers to serve your project. See How to deploy with WSGI for more details.

7. ก่อนจะทำต่อลองตรวจสอบว่า Project ที่สร้างนี้มีปัญหาอะไรไหมได้โดยเข้าไปในโฟลเดอร์ mysite แล้วสั่งรันด้วยคำสั่งต่อไปนี้

cd mysite
python manage.py runserver 


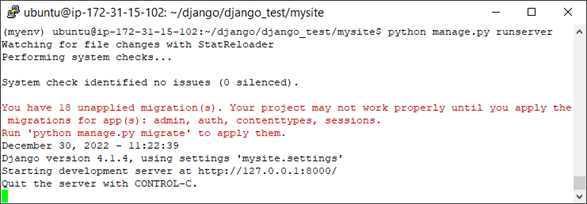
จะเห็นข้อความดังต่อไปนี้แสดงว่าไม่มีปัญหา ให้ปิด Server โดยกดปุ่ม Ctrl+C 
8. กดปุ่ม Ctrl+C เพื่อปิด Server เมื่อมาถึงขั้นตอนนี้ หากผู้เรียนตั้งชื่อและทำตามแบบเป๊ะ ๆ มาตลอดจะได้ที่อยู่ของไฟล์ต่าง ๆ ดังนี้


Deploy Django Application

1. เปิดและแก้ไขไฟล์ setting.py ใน vim editor ด้วยคำสั่ง

vi /home/ubuntu/django/django_test/mysite/mysite/settings.py


  • กดคีย์บอร์ดปุ่ม i เพื่อเพิ่ม code แล้วพิมพ์ code ต่อไปนี้ไว้ที่ด้านล่างสุดของไฟล์ 
    import os
    STATIC_URL = '/static/'
    STATIC_ROOT = os.path.join(BASE_DIR, "static/")
    STATICFILES=[STATIC_ROOT]
    ALLOWED_HOSTS = ['54.251.190.199'] 
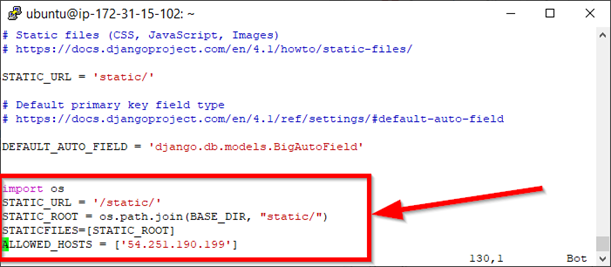
  • เมื่อพิมพ์เสร็จแล้วให้กดคีย์บอร์ดปุ่ม ESC แล้วพิมพ์ :wq จากนั้นกด Enter เพื่อบันทึกและปิดไฟล์
  • สำคัญมาก! ค่าของ ALLOWED_HOSTS ต้องกำหนดเป็น Public IPv4 address ของเครื่อง EC2 ของผู้เรียนเอง ไม่ใช่ลอกตามตัวอย่างด้านล่างนะครับ (ในตัวอย่างนี้คือค่า 54.251.190.199)

2. สำหรับคนที่ยังไม่ได้ Activate virtual environment ให้ Activate ด้วยคำสั่งต่อไปนี้ ถ้า Activate แล้วให้ข้ามไปขั้นตอนที่ 3

cd /home/ubuntu/django
source myenv/bin/activate


3. Collect the static files ด้วยคำสั่งต่อไปนี้

cd /home/ubuntu/django
python django_test/mysite/manage.py collectstatic


4. Migrate the Database ด้วยคำสั่งต่อไปนี้

python django_test/mysite/manage.py makemigrations
python django_test/mysite/manage.py migrate


5. เปลี่ยน Permission และ Ownership ด้วยคำสั่งต่อไปนี้

chmod 664 /home/ubuntu/django/django_test/mysite/db.sqlite3
sudo chown :www-data /home/ubuntu/django/django_test/mysite/db.sqlite3
sudo chown :www-data /home/ubuntu/django/django_test/mysite
sudo chown :www-data /home/ubuntu/django/django_test/mysite/mysite


6. Backup และแก้ไข Apache Config File ใน vim editor ด้วยคำสั่งต่อไปนี้

cd /etc/apache2/sites-available
sudo cp 000-default.conf 000-default.conf_backup
sudo vi 000-default.conf


  • กดคีย์บอร์ดปุ่ม i เพื่อเพิ่ม code แล้วพิมพ์ code ต่อไปนี้ไว้ด้านบนของบรรทัด ที่อยู่ด้านล่างสุดของไฟล์ 
        Alias /static /home/ubuntu/django/django_test/mysite/static
        <Directory /home/ubuntu/django/django_test/mysite/static>
            Require all granted
        </Directory>
    
        <Directory /home/ubuntu/django/django_test/mysite/mysite>
            <Files wsgi.py>
                Require all granted
            </Files>
        </Directory>
    
        WSGIPassAuthorization On
        WSGIDaemonProcess mysite python-home=/home/ubuntu/django/myenv python-path=/home/ubuntu/django/django_test/mysite
        WSGIProcessGroup mysite
        WSGIScriptAlias / /home/ubuntu/django/django_test/mysite/mysite/wsgi.py
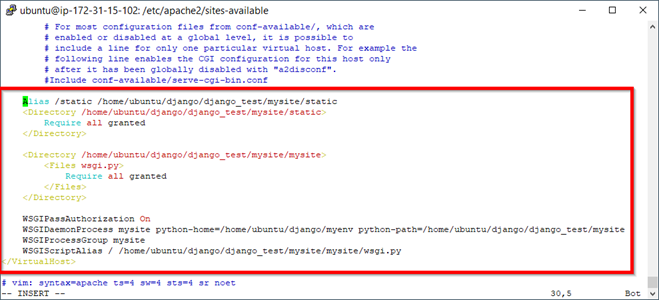
  • เมื่อพิมพ์เสร็จแล้วให้กดคีย์บอร์ดปุ่ม ESC แล้วพิมพ์ :wq จากนั้นกด Enter เพื่อบันทึกและปิดไฟล์

หมายเหตุ: ถ้าขั้นตอนก่อน ๆ หน้านี้ผู้เรียนไม่ได้ตั้งชื่อต่าง ๆ ตามตัวอย่างจะต้องใส่ชื่อตามที่ตัวเองตั้งนะครับ

7. Enable the Site และ Restart the Apache Server ด้วยคำสั่งต่อไปนี้

cd /etc/apache2/sites-available/
sudo a2ensite 000-default.conf
sudo a2enmod wsgi
sudo service apache2 restart


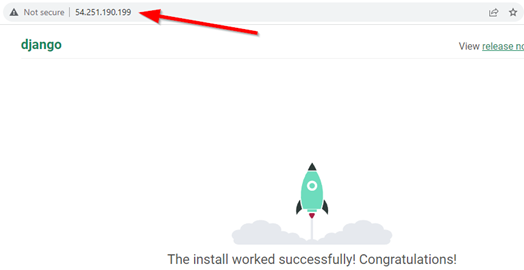
8. เมื่อถึงขั้นตอนนี้ให้ลองเข้าหน้าเว็บด้วย Public IPv4 address ของเครื่อง EC2 ของผู้เรียนดู จะต้องได้หน้าเว็บ Django ดังภาพด้านล่าง ถ้ายังไม่ได้ต้องทำให้ได้ก่อนแล้วถึงไปขั้นต่อไปได้นะครับ
 

ติดตั้ง FileZilla เพื่อให้จัดการและแก้ไข Code ได้ง่าย ๆ

1. ดาวน์โหลดโปรแกรม FileZilla Client ตามระบบปฏิบัติการที่ใช้จากที่นี่

2. เมื่อติดตั้งเรียบร้อยแล้วให้เปิดโปรแกรมขึ้นมา และทำการตั้งค่า Server ที่เราจะเชื่อมต่อโดยไปที่เมนู File > Site Manager…

3. ที่หน้าต่าง Site Manager ให้
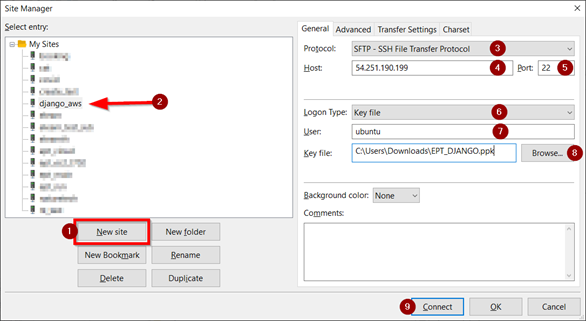
  • กดปุ่ม New site แล้วตั้งชื่อว่า django_aws
  • ช่อง Protocol ให้เลือกเป็น SFTP – SSH File Transfer Protocol
  • ช่อง Host ให้ใส่ Public IPv4 address ของ EC2 Instance (ดูได้จากหัวข้อ “ติดตั้ง Apache และ Package ที่ต้องใช้ลงบน EC2 Instance ที่สร้าง และสร้าง Python Virtual Environment สำหรับ Django project” ขั้นตอนที่ 1) 
  • ช่อง Port ใส่ 22
  • ช่อง Logon Type ให้เลือกเป็น Key file
  • ช่อง User ใส่ ubuntu
  • ช่อง Key file ให้ใส่ path ของไฟล์ EPT_DJANGO.ppk
  • กดปุ่ม Connect


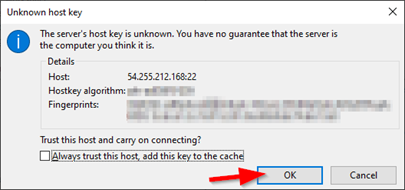
4. จะมีหน้าต่าง Unknown host key ปรากฏขึ้นมาให้คลิก OK
5. รอสักครู่ เมื่อเชื่อมต่อเสร็จโดยทั่วไปโปรแกรมจะให้เราเข้าไปที่ directory ค่าตั้งต้นคือ /home/ubuntu


สร้างเว็บบล็อกด้วย Django

คุณสมบัติของเว็บบล็อกที่จะสร้าง

  • สร้าง อัปเดต และลบโพสต์ได้
  • กำหนดหมวดหมู่ (category) ให้แต่ละโพสต์ได้
  • แสดงโพสต์ทุกโพสต์ที่หน้าแรก สามารถกดเข้าไปเพื่ออ่านโพสต์แบบเต็ม ๆ ได้
  • ผู้ใช้งานสามารถเขียนความคิดเห็นในหน้าแต่ละโพสต์ได้
  • ใช้ฐานข้อมูลด้วย SQLite


ขั้นตอนการสร้างเว็บบล็อก

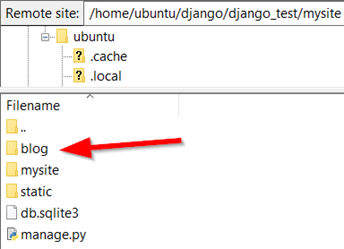
1. เปิดโปรแกรม Putty ขึ้นมาแล้วเชื่อมต่อไปยังเครื่อง EC2 เครื่องเดิม เราจะสร้างแอป Django ใหม่ชื่อ blog ด้วยคำสั่งต่อไปนี้

cd /home/ubuntu/django
source myenv/bin/activate
cd /home/ubuntu/django/django_test/mysite
python manage.py startapp blog


จะได้โฟลเดอร์ blog เพิ่มขึ้นมาดังภาพ

2. เปิดโปรแกรม FileZilla Client แล้วเชื่อมต่อไปยังเครื่อง EC2 เครื่องเดิม 
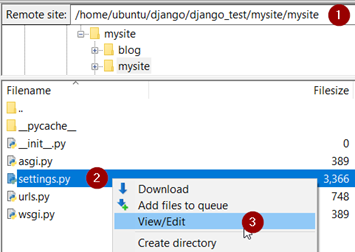
  • เข้าไปที่โฟลเดอร์ /home/ubuntu/django/django_test/mysite/mysite โดยพิมพ์ที่ช่อง Remote site แล้วกด Enter
  • แก้ไขไฟล์ settings.py ได้โดยคลิกขวาที่ไฟล์แล้วเลือก View/Edit เพื่อเปิดไฟล์ขึ้นมา (บางครั้ง FileZilla อาจให้เลือกว่าต้องการเปิดด้วยโปรแกรมอะไร)
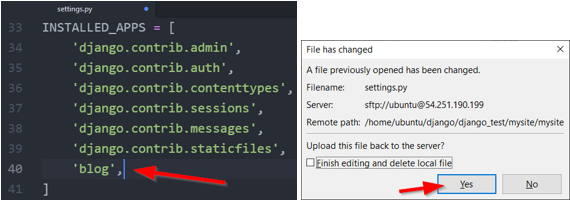
  • รอสักครู่ไฟล์จะถูกเปิดด้วย Text editor ของเครื่องผู้เรียน ให้เพิ่ม 'blog', ลงไปในตัวแปร INSTALLED_APPS แล้วบันทึกไฟล์
  • เมื่อมีการบันทึกไฟล์เกิดขึ้น ที่หน้าของ FileZilla จะขึ้นหน้าต่างถามว่าเราต้องการอัปโหลดไฟล์ที่แก้ไขแล้วนี้ไหม ให้กดปุ่ม Yes

   
3. เพิ่ม Models ของเว็บบล็อก ซึ่งในตัวอย่างนี้จะสร้างตารางในฐานข้อมูล 3 ตาราง ได้แก่ Category, Post และ Comment ดังนี้

ตาราง Category ประกอบด้วย Field 

  • name สำหรับเก็บชื่อของหมวดหมู่ กำหนดให้ขนาดไม่เกิน 20 ตัวอักขระ

ตาราง Post ประกอบด้วย Field

  • title สำหรับเก็บชื่อโพสต์ กำหนดให้ขนาดไม่เกิน 255 ตัวอักขระ
  • body สำหรับเก็บเนื้อหาโพสต์ ไม่กำหนดขนาด
  • created_on สำหรับเก็บวันเวลาที่สร้างโพสต์
  • last_modified สำหรับเก็บวันเวลาที่แก้ไขโพสต์
  • categories สำหรับเก็บหมวดหมู่ของโพสต์ โดยจะเชื่อมโยงกับตาราง Category

ตาราง Comment ประกอบด้วย Field

  • author สำหรับเก็บชื่อคนเขียนความคิดเห็น กำหนดให้ขนาดไม่เกิน 60 ตัวอักขระ
  • body สำหรับเก็บเนื้อหาความคิดเห็น ไม่กำหนดขนาด
  • created_on สำหรับเก็บวันเวลาที่สร้างความคิดเห็น
  • post สำหรับเก็บว่าเป็นความคิดเห็นของโพสต์ไหน โดยจะเชื่อมโยงกับตาราง Post

ขั้นตอน

  • ไปที่โฟลเดอร์ /home/ubuntu/django/django_test/mysite/blog
  • เปิดและแก้ไขไฟล์ models.py เป็นดังต่อไปนี้ เสร็จแล้วอย่าลืมบันทึกไฟล์และอัปโหลดกลับไปที่เครื่อง EC2 นะครับ
    from django.db import models
    
    class Category(models.Model):
        name = models.CharField(max_length=20)
    
    class Post(models.Model):
        title = models.CharField(max_length=255)
        body = models.TextField()
        created_on = models.DateTimeField(auto_now_add=True)
        last_modified = models.DateTimeField(auto_now=True)
        categories = models.ManyToManyField('Category', related_name='posts')
    
    class Comment(models.Model):
        author = models.CharField(max_length=60)
        body = models.TextField()
        created_on = models.DateTimeField(auto_now_add=True)
        post = models.ForeignKey('Post', on_delete=models.CASCADE)


4. หลังจากสร้าง Models เสร็จแล้ว ต้องทำการ Migrate โดยไปที่โปรแกรม Putty แล้วพิมพ์คำสั่งต่อไปนี้

หมายเหตุ: ถ้าใครต้องเข้าใหม่อย่าลืม Activate environment ก่อน แล้วเข้าไปที่โฟลเดอร์ /home/ubuntu/django/django_test/mysite ซึ่งมีไฟล์อยู่ก่อนด้วย (ถ้างงให้ดูตัวอย่างในขั้นตอนที่ 1)

python manage.py makemigrations blog
python manage.py migrate


5. ตั้งค่าต่าง ๆ เพื่อใช้งาน Django Admin ซึ่งเป็น tool ที่จะช่วยให้เราจัดการข้อมูลของ Models ในฐานข้อมูลผ่านทางหน้าเว็บได้

  • สร้าง User เพื่อใช้สำหรับล็อกอินเข้าหน้า Django Admin โดยพิมพ์คำสั่งต่อไปนี้ใน Putty
    python manage.py createsuperuser
  • ระบบจะให้เราใส่ข้อมูลต่าง ๆ ซึ่งผู้เรียนสามารถใส่ได้ตามใจเลย แต่ขอให้จำข้อมูลที่ใส่ไว้ด้วยเพราะเราจะต้องใช้ Username และ Password ที่ตั้งนี้ล็อกอินเข้าหน้า Django Admin ถ้าใครกลัวงงก็ใส่ตามตัวอย่างนี้ได้เลยครับ
    • Username (leave blank to use 'ubuntu'): admin
    • Email address: admin@test.com
    • Password: 1234
    • Password (again): 1234
    • จะมีคำเตือนว่าพาสเวิร์ดของเราสั้นและง่ายไปจะสร้าง user ไหม ให้พิมพ์ y แล้วกด Enter เพื่อยืนยันครับ

       
  • กลับมาที่โปรแกรม FileZilla เราจะทำการ register โมเดล Category และ Post เข้าไปในหน้า admin (ในตัวอย่างนี้จะไม่ได้ register โมเดล Comment เพราะจะให้ผู้ใช้งานเป็นคนเขียน แต่ถ้าใครอยากเพิ่มเพื่อให้ admin แก้ไขได้ก็แล้วแต่เลยครับ)
  • เปิดและแก้ไขไฟล์ /home/ubuntu/django/django_test/mysite/blog/admin.py เป็นดังนี้ เสร็จแล้วอย่าลืมบันทึกไฟล์และอัปโหลดกลับไปที่เครื่อง EC2 นะครับ
    from django.contrib import admin
    from blog.models import Category, Post
    
    admin.site.register(Category)
    admin.site.register(Post)


  • ไปที่ Putty แล้ว Restart Apache Server ด้วยคำสั่ง
    sudo service apache2 restart
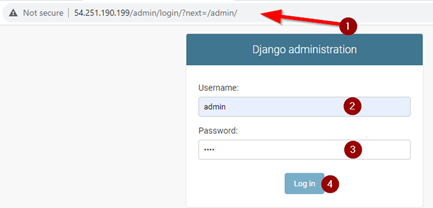
  • ทดลองเข้าหน้าเว็บ Django Admin จาก URL http:///admin เช่น ในตัวอย่างนี้คือ http://54.251.190.199/admin จะปรากฏหน้าสำหรับล็อกอินดังภาพ ให้ใส่ Username และ Password ที่ตั้งค่าไว้ตอนสร้าง User ถ้าใส่ตาม Worksheet นี้ Username จะเป็น admin และ Password จะเป็น 1234
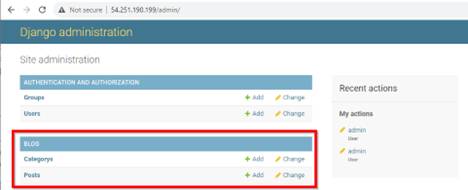
  • หลังกดปุ่ม Login แล้วจะพบกับหน้า Django administration ดังภาพ ซึ่งจะเห็นว่ามีหัวข้อ BLOG ที่เราสามารถทำการเพิ่มหรือแก้ไขข้อมูลในตาราง Category และ Post ได้
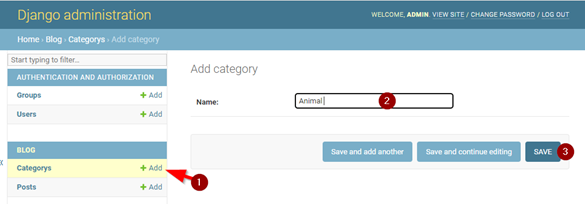
  • ให้ผู้เรียนกดเข้าไปที่ Categorys แล้วทำการสร้าง Category 2 อัน คือ Animal และ Food (หรือจะคิดเองก็ได้ครับ) เพื่อเตรียมข้อมูลไว้สำหรับทดสอบการแสดงผลของหน้าเว็บที่เรากำลังสร้าง
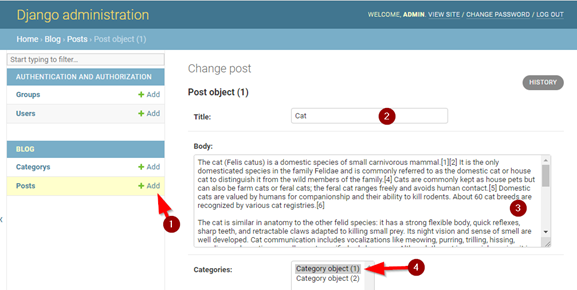
  • จากนั้นกดเข้าไปที่ Posts แล้วทำการสร้าง สร้าง Post 4 อันขึ้นไป เนื้อหาอะไรก็ได้ให้อยู่ทั้งสองหมวดหมู่ (อย่าลืมเลือก Categories ให้ถูกต้องด้วยนะครับ)


6. สร้างฟังก์ชัน View เพื่อนำข้อมูลจากฐานข้อมูลมาแสดงบน HTML template และฟอร์มสำหรับ Comment

ในตัวอย่างนี้เราจะสร้างฟังก์ชัน View 3 ฟังก์ชัน ดังนี้

  • blog_index ใช้แสดงโพสต์ทั้งหมด
  • blog_detail ใช้แสดงโพสต์ที่เลือกแบบเต็ม ๆ พร้อมทั้งมีแบบฟอร์มให้ผู้ใช้งานเขียนความคิดเห็นด้วย
  • blog_category ใช้แสดงโพสต์ทั้งหมดในหมวดหมู่ที่เลือก

เขียน Code แต่ละไฟล์ดังต่อไปนี้ เสร็จแล้วอย่าลืมบันทึกไฟล์และอัปโหลดกลับไปที่เครื่อง EC2 นะครับ

  • แก้ไฟล์ /home/ubuntu/django/django_test/mysite/blog/views.py
    from django.shortcuts import render
    from blog.models import Post, Comment
    from .forms import CommentForm
    
    def blog_index(request):
        posts = Post.objects.all().order_by('-created_on')
        context = {
            "posts": posts,
        }
        return render(request, "blog_index.html", context)
    
    def blog_category(request, category):
        posts = Post.objects.filter(
            categories__name__contains=category
        ).order_by(
            '-created_on'
        )
        context = {
            "category": category,
            "posts": posts
        }
        return render(request, "blog_category.html", context)
    
    def blog_detail(request, pk):
        post = Post.objects.get(pk=pk)
    
        form = CommentForm()
        if request.method == 'POST':
            form = CommentForm(request.POST)
            if form.is_valid():
                comment = Comment(
                    author=form.cleaned_data["author"],
                    body=form.cleaned_data["body"],
                    post=post
                )
                comment.save()
    
        comments = Comment.objects.filter(post=post)
        context = {
            "post": post,
            "comments": comments,
            "form": form,
        }
        return render(request, "blog_detail.html", context)


  • สร้างไฟล์ /home/ubuntu/django/django_test/mysite/blog/forms.py ได้โดยไปที่โฟลเดอร์ /home/ubuntu/django/django_test/mysite/blog แล้วคลิกขวาที่พื้นที่ว่าง จากนั้นเลือก Create new file แล้วตั้งชื่อไฟล์ว่า forms.py และกด OK เสร็จแล้วเปิดไฟล์ขึ้นมาและเขียน Code ต่อไปนี้
    from django import forms
    
    class CommentForm(forms.Form):
        author = forms.CharField(
            max_length=60,
            widget=forms.TextInput(attrs={
                "class": "form-control",
                "placeholder": "Your Name"
            })
        )
        body = forms.CharField(widget=forms.Textarea(
            attrs={
                "class": "form-control",
                "placeholder": "Your comment"
            })
        )


  • สร้างไฟล์ /home/ubuntu/django/django_test/mysite/blog/urls.py แล้วเขียน Code เพื่อกำหนด URL path ดังนี้ 
    - http:///blog เป็นหน้าแสดงโพสต์ทั้งหมด
    - http:///blog/<ตัวเลข_id_ของโพสต์> เป็นหน้าแสดงโพสต์ที่เลือกแบบเต็ม ๆ
    - http:///blog/ เป็นหน้าแสดงโพสต์ทั้งหมดในหมวดหมู่ที่เลือก
    from django.urls import path
    from . import views
    
    urlpatterns = [
        path("", views.blog_index, name="blog_index"),
        path("<int:pk>/", views.blog_detail, name="blog_detail"),
        path("<category>/", views.blog_category, name="blog_category"),
    ]


  • แก้ไฟล์ /home/ubuntu/django/django_test/mysite/mysite/urls.py
    from django.contrib import admin
    from django.urls import path, include
    
    urlpatterns = [
        path('admin/', admin.site.urls),
        path("blog/", include("blog.urls")),
    ]


7. สร้าง Template หรือก็คือหน้าตาเว็บของเราแต่ละหน้านั่นเอง ก่อนอื่นให้สร้างโฟลเดอร์ templates ในโฟลเดอร์ /home/ubuntu/django/django_test/mysite/blog โดยไปที่โฟลเดอร์ /home/ubuntu/django/django_test/mysite/blog แล้วคลิกขวาที่พื้นที่ว่าง จากนั้นเลือก Create directory แล้วใส่ directory แบบเต็มคือ /home/ubuntu/django/django_test/mysite/blog/templates จากนั้นกด OK

8. ภายในโฟลเดอร์ templates ให้สร้างไฟล์และเขียน Code ดังต่อไปนี้

  • ไฟล์ /home/ubuntu/django/django_test/mysite/blog/templates/base.html สำหรับการใช้ Bootstrap นั้นจะติดตั้งด้วย pip ก็ได้ แต่เพื่อความง่าย ในตัวอย่างนี้จึงใช้ Bootstrap CDN ดังนี้
    <link rel="stylesheet" href="https://stackpath.bootstrapcdn.com/bootstrap/4.1.3/css/bootstrap.min.css">
    
    {% block page_content %}{% endblock %}
    
    <script src="https://code.jquery.com/jquery-3.3.1.slim.min.js"></script>
    <script src="https://cdnjs.cloudflare.com/ajax/libs/popper.js/1.14.3/umd/popper.min.js">
    </script>
    <script src="https://stackpath.bootstrapcdn.com/bootstrap/4.1.3/js/bootstrap.min.js">
    </script>


  • ไฟล์ /home/ubuntu/django/django_test/mysite/blog/templates/blog_index.html เป็นหน้าแสดงโพสต์ทั้งหมด
    {% extends "base.html" %}
    {% block page_content %}
    <div class="col-md-8 offset-md-2">
        <h1>My Blog - หน้าเว็บบล็อกหลัก</h1>
        <p>กรุณาคลิกหัวข้อโพสต์ที่ต้องการอ่าน หรือคลิกที่ Category เพื่อแสดงเฉพาะโพสต์ที่อยู่ในหมวดหมู่นั้น</p>
        <hr>
        {% for post in posts %}
        <h2><a href="{% url 'blog_detail' post.pk%}">{{ post.title }}</a></h2>
        <small>
            {{ post.created_on.date }} |&nbsp;
            Categories:&nbsp;
            {% for category in post.categories.all %}
            <a href="{% url 'blog_category' category.name %}">
                {{ category.name }}
            </a>&nbsp;
            {% endfor %}
        </small>
        <p>{{ post.body | slice:":400" }}...
            <a href="{% url 'blog_detail' post.pk%}">
                Read more
            </a>
        </p>
        <hr>
        {% endfor %}
    </div>
    {% endblock %}


  • ไฟล์ /home/ubuntu/django/django_test/mysite/blog/templates/blog_category.html เป็นหน้าแสดงโพสต์ตามหมวดหมู่
    {% extends "base.html" %}
    {% block page_content %}
    <div class="col-md-8 offset-md-2">
        <h1>Category: {{ category | title }}</h1>
        <hr>
        {% for post in posts %}
            <h2><a href="{% url 'blog_detail' post.pk%}">{{ post.title }}</a></h2>
            <small>
                {{ post.created_on.date }} |&nbsp;
                Categories:&nbsp;
                {% for category in post.categories.all %}
                <a href="{% url 'blog_category' category.name %}">
                    {{ category.name }}
                </a>&nbsp;
                {% endfor %}
            </small>
            <p>{{ post.body | slice:":400" }}...
                <a href="{% url 'blog_detail' post.pk%}">
                    Read more
                </a>
            </p>
            <hr>
        {% endfor %}
    </div>
    {% endblock %}


  • ไฟล์ /home/ubuntu/django/django_test/mysite/blog/templates/blog_detail.html เป็นหน้าแสดงโพสต์ที่เลือกแบบเต็ม ๆ
    {% extends "base.html" %}
    {% block page_content %}
    <div class="col-md-8 offset-md-2">
        <h1>{{ post.title }}</h1>
        <small>
            {{ post.created_on.date }} |&nbsp;
            Categories:&nbsp;
            {% for category in post.categories.all %}
            <a href="{% url 'blog_category' category.name %}">
                {{ category.name }}
            </a>&nbsp;
            {% endfor %}
        </small>
        <p>{{ post.body | linebreaks }}</p>
        <br>
        <a href="/blog">Back to My Blog</a>
        <hr>
        <h3>Leave a comment:</h3>
        <form action="/blog/{{ post.pk }}/" method="post">
            {% csrf_token %}
            <div class="form-group">
                {{ form.author }}
            </div>
            <div class="form-group">
                {{ form.body }}
            </div>
            <button type="submit" class="btn btn-primary">Submit</button>
        </form>
        <h3>Comments:</h3>
        {% for comment in comments %}
        <p>
            On {{comment.created_on.date }}&nbsp;
            <b>{{ comment.author }}</b> wrote:
        </p>
        <p>{{ comment.body }}</p>
        <hr>
        {% endfor %}
    </div>
    {% endblock %}


9. ที่ไฟล์ /home/ubuntu/django/django_test/mysite/mysite/settings.py ให้แก้ค่าของ 'DIRS' ในตัวแปร TEMPLATES เป็น ['blog/templates/base.html'] ดังนั้นตัวแปร TEMPLATES จะเป็นดังนี้

TEMPLATES = [
    {
        'BACKEND': 'django.template.backends.django.DjangoTemplates',
        'DIRS': ['blog/templates/base.html'],
        'APP_DIRS': True,
        'OPTIONS': {
            'context_processors': [
                'django.template.context_processors.debug',
                'django.template.context_processors.request',
                'django.contrib.auth.context_processors.auth',
                'django.contrib.messages.context_processors.messages',
            ],
        },
    },
]

10. ไปที่ Putty แล้ว Restart Apache Server ด้วยคำสั่ง

sudo service apache2 restart


11. เสร็จแล้วครับ เย้ ๆ ๆ ทีนี้เราก็มาลองเข้าหน้าเว็บกันดูเลย โดยไปที่ http:///blog จะเห็นโพสต์ทั้งหมด ให้ลองทดสอบดูว่าทุกอย่างทำงานได้ถูกต้องไหม ถ้ามีปัญหาก็ขอให้ค่อย ๆ ไล่ดูแล้วทำตามทีละขั้นตอนอีกทีนะครับ
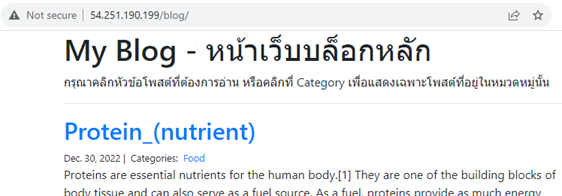
  • หน้ารวมโพสต์ทั้งหมด
  • กดเลือกโพสต์
  • กดเลือกหมวดหมู่
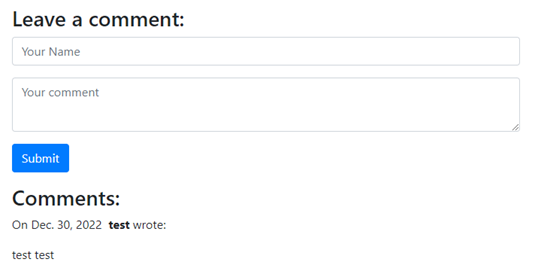
  • เขียนความคิดเห็นด้านล่างโพสต์


เหนื่อยไหมครับ ขั้นตอนค่อนข้างยาว แต่ถ้าค่อย ๆ ทำตามทีละขั้นจะเห็นว่าไม่ยากเลยว่าไหมครับ ถ้าใครเห็น Code แล้วมึน ขอแนะนำคอร์ส Python + Web Programming (PHP101-PY) ของทาง EPT ที่สอนละเอียดสุด ๆ ตั้งแต่ขั้นพื้นฐานจนทำเว็บได้เอง รับรองว่าเรียนจบ+ทำโจทย์ครบ ๆ แล้วมาทำตามบทความนี้อีกครั้งไม่มึนแน่นอน แล้วพบกันใหม่บทความหน้าครับ


Tag ที่น่าสนใจ: django aws_ec2 python web_development virtual_environment apache programming web_application deployment amazon_aws python_programming django_project python_virtual_environment amazon_ec2 aws_deployment


บทความนี้อาจจะมีที่ผิด กรุณาตรวจสอบก่อนใช้

หากมีข้อผิดพลาด/ต้องการพูดคุยเพิ่มเติมเกี่ยวกับบทความนี้ กรุณาแจ้งที่ http://m.me/Expert.Programming.Tutor

ไม่อยากอ่าน Tutorial อยากมาเรียนเลยทำอย่างไร?

สมัครเรียน ONLINE ได้ทันทีที่ https://elearn.expert-programming-tutor.com

หรือติดต่อ

085-350-7540 (DTAC)
084-88-00-255 (AIS)
026-111-618
หรือทาง EMAIL: NTPRINTF@GMAIL.COM
แผนที่ ที่ตั้งของอาคารของเรา

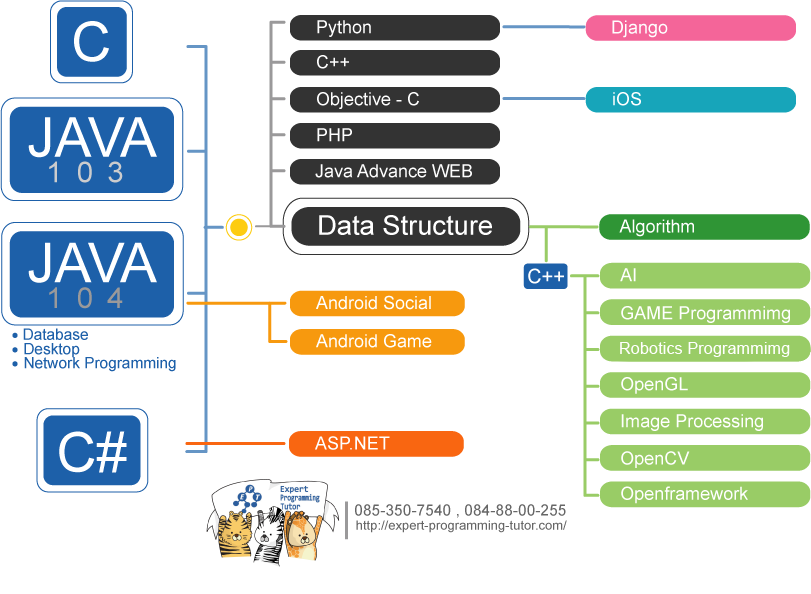
แผนผังการเรียนเขียนโปรแกรม

Link อื่นๆ

Allow sites to save and read cookie data.
Cookies are small pieces of data created by sites you visit. They make your online experience easier by saving browsing information. We use cookies to improve your experience on our website. By browsing this website, you agree to our use of cookies.

Copyright (c) 2013 expert-programming-tutor.com. All rights reserved. | 085-350-7540 | 084-88-00-255 | ntprintf@gmail.com

ติดต่อเราได้ที่

085-350-7540 (DTAC)
084-88-00-255 (AIS)
026-111-618
หรือทาง EMAIL: NTPRINTF@GMAIL.COM
แผนที่ ที่ตั้งของอาคารของเรา