สมัครเรียนโทร. 085-350-7540 , 084-88-00-255 , ntprintf@gmail.com

Web Programming

ASP.NET ต่างกับ ASP อย่างไร JavaScript - HelloWorld npm - Intro AngularJS - HelloWorld VueJS - HelloWorld webpack - Intro ASP.NET - HelloWorld Flask - HelloWorld Web Server คืออะไร API คืออะไร Maven - HelloWorld Nancy - HelloWorld Protocol คืออะไร วิธีติดตั้ง Web Server บน Ubuntu วิธีติดตั้ง PrestaShop with PHP 8 (ใช้ Amazon Lightsail) วิธีติดตั้ง XAMPP บน Ubuntu 22.04 วิธีติดตั้ง WordPress บน XAMPP บน Ubuntu 22.04 React - Simple Web App - People Counter React - Simple Web App - People Counter 2 React - Web App - Dictionary React - Web App - Multiple Pages React - Web App - Multiple Pages with APIs React - Web App - Calculator React - Web App - Smart Parking วิธีสร้าง AWS EC2 instance สร้าง Web Application โดยใช้ Django และ Deploy บน AWS EC2 React - Create and Run React Application React - Web App - SpO2 Tracker วิธีติดตั้งและใช้งาน CKEditor 5 Introduction to JSON JSON Full Form: JavaScript Object Notation History of JSON JSON vs XML Structure of JSON JSON Data Types JSON Objects Explained JSON Arrays Explained Key-Value Pairs in JSON JSON String Data Type JSON Number Data Type JSON Boolean Data Type JSON Null Data Type Nested JSON Objects JSON in APIs JSON Schema Overview How to Write JSON JSON File Extensions (.json) JSON Syntax Rules JSON Parsing in JavaScript JSON Stringify in JavaScript How to Use JSON.parse() How to Use JSON.stringify() Escaping Characters in JSON JSON Comments (and why they are not allowed) JSON in Web Development Sending JSON Data with HTTP Requests Receiving JSON Responses in APIs REST APIs and JSON JSON in AJAX Requests Working with JSON in Node.js How to Read a JSON File Saving Data in JSON Format How to Validate JSON JSONLint for Validation JSON Pretty Print JSON Minification JSON vs YAML JSON and JavaScript Compatibility JSON and Python Integration Working with JSON in Python (json module) JSON in Java (Jackson and GSON) JSON in C++ (RapidJSON and nlohmann/json) JSON in C# (Json.NET) JSON in PHP (json_encode and json_decode) How to Fetch JSON Data from APIs Fetching JSON in Python (requests module) Fetching JSON in JavaScript (fetch API) Fetching JSON in jQuery JSON Serialization JSON Deserialization JSON Data Interchange Common Errors in JSON Syntax Handling Large JSON Files Streaming JSON Data JSON Pagination Techniques JSON as a Configuration Format JSON in Cloud Storage JSON and MongoDB BSON vs JSON in MongoDB JSON Web Tokens (JWT) Security Considerations with JSON Cross-Origin Resource Sharing (CORS) and JSON JSON Schema Validation Creating a JSON Schema Required Fields in JSON Schema JSON Schema Property Types JSON Schema Examples Benefits of JSON Schema JSONPath: Querying JSON Data JSON Data Transformation Comparing Two JSON Objects Sorting JSON Data Flattening JSON Structures JSON Merge Techniques JSON in NoSQL Databases JSON in Relational Databases Storing JSON in MySQL JSON Functions in MySQL JSON Functions in PostgreSQL JSON Functions in SQL Server JSON and Elasticsearch Advantages of Using JSON Limitations of JSON JSON and GraphQL JSONP (JSON with Padding) JSON and Local Storage in Browsers JSON and Cookies JSON and Session Storage Importing and Exporting JSON Nested vs Flattened JSON Structures JSON Best Practices Debugging JSON Errors JSON Performance Optimization Real-Time Data with JSON Microservices and JSON JSON Versioning JSON in IoT Applications JSON for Data Exchange in Mobile Apps The Future of JSON Introduction to XML XML Full Form: eXtensible Markup Language History of XML XML vs HTML XML vs JSON Structure of XML XML Syntax Rules XML Elements Explained XML Attributes Explained XML Tags XML Prolog XML Declaration XML Namespaces XML Data Types XML Comments XML Empty Elements XML Well-Formed Documents XML Valid Documents XML DTD (Document Type Definition) XML Schema Definition (XSD) XML vs XSD XML vs DTD XML Namespaces Best Practices XML Parsers XML DOM (Document Object Model) SAX Parser in XML XML Parsing in Java XML Parsing in Python XML Parsing in C# XML Parsing in JavaScript XML with PHP How to Read XML Files How to Write XML Files How to Validate XML XML Formatting and Pretty Print XML Minification XML Tree Structure XML as a Data Interchange Format XML in Web Services SOAP and XML REST vs SOAP (XML in APIs) XML in AJAX XMLHTTPRequest in JavaScript XML in Mobile Applications How to Transform XML with XSLT XSLT for Formatting XML XPath Overview XPath Syntax XPath Expressions and Queries XML Query Languages XQuery Overview XLink for XML Linking XPointer for XML Fragment Identification XML for Configuration Files Storing XML in Databases XML in MySQL XML in PostgreSQL XML in SQL Server XML in Oracle Database XML Indexing XML Data Modeling XML and SOAP Faults XML Encryption XML Digital Signatures Security Best Practices for XML XML Schema Elements XML Schema Attributes XML Schema Validation XML Schema Restrictions and Extensions XML Schema Choice and Sequence Benefits of Using XML Limitations of XML XML in Big Data XML and NoSQL Databases XML for IoT Applications XML in E-commerce Systems XML for Document Storage XML for Multimedia Content XML in Content Management Systems XML and Microservices XML and Cloud Computing XML for RSS Feeds Atom and XML Feeds XML in Office Document Formats (DOCX, XLSX) XML and SVG (Scalable Vector Graphics) XML for Vector Graphics XML Compression Techniques XML with WebSockets XML in Real-Time Applications JSON vs XML Performance XML and CORS (Cross-Origin Resource Sharing) XML for API Design Common XML Parsing Errors Debugging XML Converting XML to JSON Converting JSON to XML XML Best Practices XML Versioning XML and GraphQL The Future of XML

วิธีติดตั้งและใช้งาน CKEditor 5 บนเว็บไซต์ของเรา

CKEditor คืออะไร

CKEditor เป็นเครื่องมือสำหรับพิมพ์ข้อความแบบ WYSIWYG หรือก็คือเนื้อหาที่เราเห็นระหว่างพิมพ์แก้ไขกับเนื้อหาหลังจากแก้ไขจะมีรูปแบบเดียวกัน ซึ่งจะช่วยให้ผู้ใช้งานเขียนบทความหรือเนื้อหาต่าง ๆ ลงเว็บได้ง่าย ๆ เหมือนพิมพ์ในโปรแกรมอย่าง Microsoft Word โดยไม่จำเป็นต้องมีความรู้เรื่องภาษา HTML เลย

ในบทความนี้จะแนะนำวิธีติดตั้งและใช้งาน CKEditor 5 ซึ่งเป็นเวอร์ชันใหม่ล่าสุดแบบง่าย ๆ 3 วิธี ลองทำตามกันดูนะครับ

หมายเหตุ: ในบทความนี้เป็นวิธีติดตั้ง CKEditor 5 แต่นำไปประยุกต์ใช้กับเวอร์ชันอื่นได้ เนื่องจากวิธีไม่ต่างกันมากครับ


วิธีติดตั้งและใช้งาน CKEditor 5 วิธีที่ 1 - CDN

วิธีนี้เป็นวิธีที่ง่ายที่สุด เพียงแค่เพิ่ม Code 3 ส่วนต่อไปนี้ลงในหน้าเว็บของเราก็ใช้งานได้แล้ว

1. ที่ส่วน head ให้โหลด CKEditor 5 ในตัวอย่างนี้จะใช้แบบ classic editor build

<script src="https://cdn.ckeditor.com/ckeditor5/40.2.0/classic/ckeditor.js"></script>

2. ส่วน body เพิ่ม element ที่จะแสดง CKEditor

<div id="editor"></div>

3. เพิ่ม script สำหรับแสดง CKEditor

<script>
    ClassicEditor
        .create( document.querySelector( '#editor' ) )
        .catch( error => {
            console.error( error );
        } );
</script>

ตัวอย่างไฟล์หน้าเว็บแบบเต็ม ๆ

<!DOCTYPE html>
<html lang="en">
<head>
    <meta charset="utf-8">
    <title>CKEditor 5 – Classic editor</title>
    <script src="https://cdn.ckeditor.com/ckeditor5/40.2.0/classic/ckeditor.js"></script>
</head>
<body>
    <h1>Classic editor</h1>
    <div id="editor">
        <p>This is some sample content.</p>
    </div>
    <script>
        ClassicEditor
            .create( document.querySelector( '#editor' ) )
            .catch( error => {
                console.error( error );
            } );
    </script>
</body>
</html>

เมื่อลองเข้าหน้าเว็บที่สร้างดูจะเห็นว่ามี CKEditor ดังภาพ


วิธีติดตั้งและใช้งาน CKEditor 5 วิธีที่ 2 - Predefined CKEditor 5 build

วิธีนี้จะต่างกับวิธีที่ 1 คือ เราจะดาวน์โหลดตัว CKEditor 5 แล้วติดตั้งบนเซิร์ฟเวอร์ของเราเลย

1. ดาวน์โหลด CKEditor 5 จากเว็บ https://ckeditor.com/ckeditor-5/download/
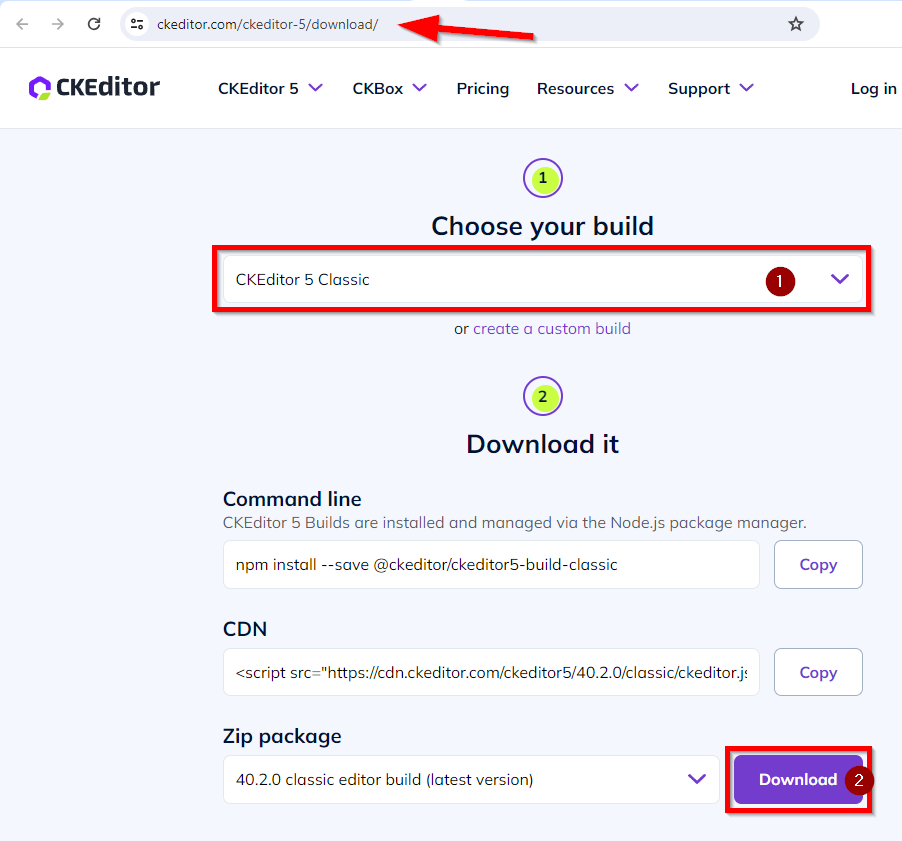
  • ในตัวอย่างนี้จะเลือก build เป็น CKEditor 5 Classic
  • กดปุ่ม Download ได้เลย


2. เมื่อดาวน์โหลดแล้วจะได้ไฟล์ชื่อ ckeditor5-build-xxx.zip ให้แตกไฟล์แล้วอัปโหลดโฟลเดอร์ของ ckeditor ที่ได้มานี้ขึ้นไปยังเซิร์ฟเวอร์ของเรา เช่นในตัวอย่างนี้คือ แตกไฟล์ ckeditor5-build-classic-40.2.0.zip แล้วได้โฟลเดอร์ชื่อ ckeditor5-build-classic

3. ในไฟล์หน้าเว็บของเรา ให้เพิ่ม Code 3 ส่วน เช่นเดียวกับวิธีที่ 1

  • ที่ส่วน head ให้เรียกไฟล์ ckeditor.js จากโฟลเดอร์ที่อัปโหลดในขั้นตอนที่แล้ว ต้องใส่ Path ของไฟล์ให้ถูกต้องด้วยนะครับ
    <script src="[ckeditor-build-path]/ckeditor.js"></script>
     
  • ส่วน body เพิ่ม element ที่จะแสดง CKEditor
  • เพิ่ม script สำหรับแสดง CKEditor

ตัวอย่างไฟล์หน้าเว็บแบบเต็ม ๆ

<!DOCTYPE html>
<html lang="en">
<head>
    <meta charset="utf-8">
    <title>CKEditor 5 – Classic editor build sample</title>
    <script src="ckeditor5-build-classic/ckeditor.js"></script>
</head>
<body>
    <h1>Classic editor build sample</h1>
    <div id="editor">
        <p>This is some sample content.</p>
    </div>
    <script>
        ClassicEditor
            .create( document.querySelector( '#editor' ) )
            .catch( error => {
                console.error( error );
            } );
    </script>
</body>
</html>

เมื่อลองเข้าหน้าเว็บที่สร้างดูจะเห็นว่ามี CKEditor ดังภาพ


วิธีติดตั้งและใช้งาน CKEditor 5 วิธีที่ 3 - Custom CKEditor 5 build

วิธีนี้จะต่างกับวิธีที่ 2 เล็กน้อยคือ แทนที่จะดาวน์โหลด CKEditor ที่ build มาสำเร็จรูปแล้ว เราจะ build เอง เพื่อเพิ่มฟังก์ชันที่ต้องการให้ CKEditor ของเรา

1. ไปที่หน้าเว็บ Online builder ของ CKEditor 5 (https://ckeditor.com/ckeditor-5/online-builder/)

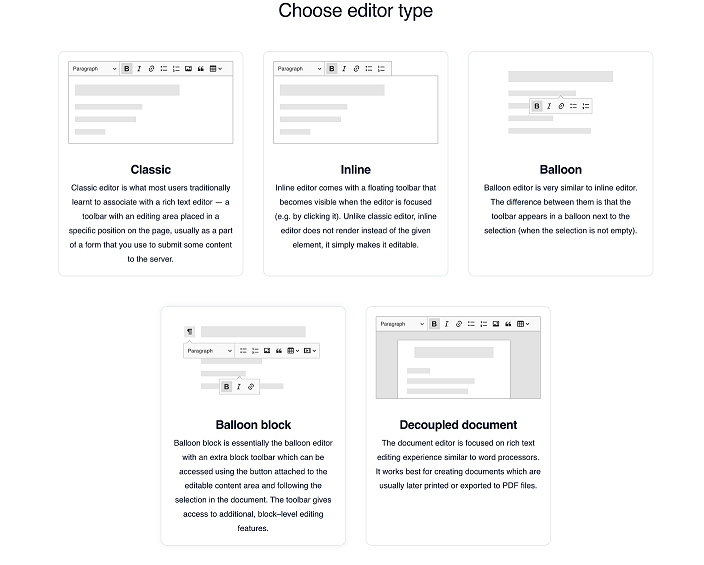
2. เลือกชนิด editor ที่ต้องการ
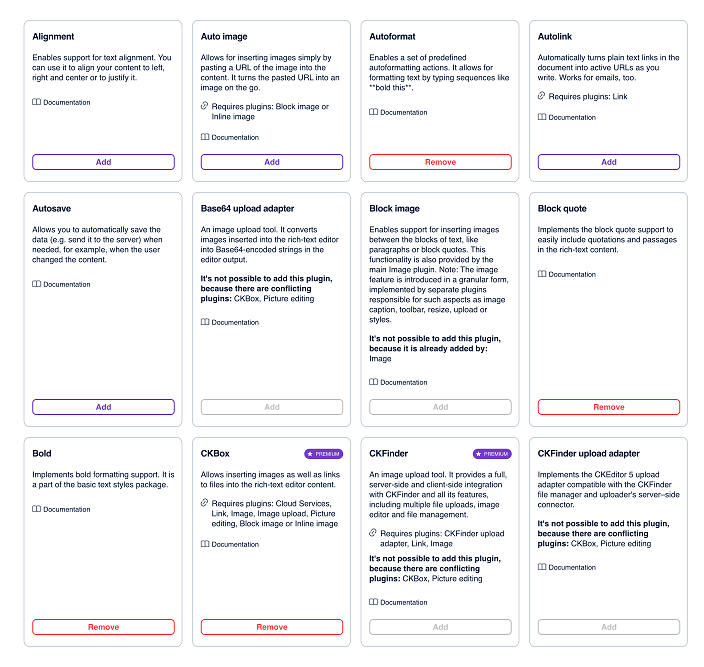
3. เลือก plugin ทั้งหมดที่ต้องการ เสร็จแล้วกดปุ่ม Next step
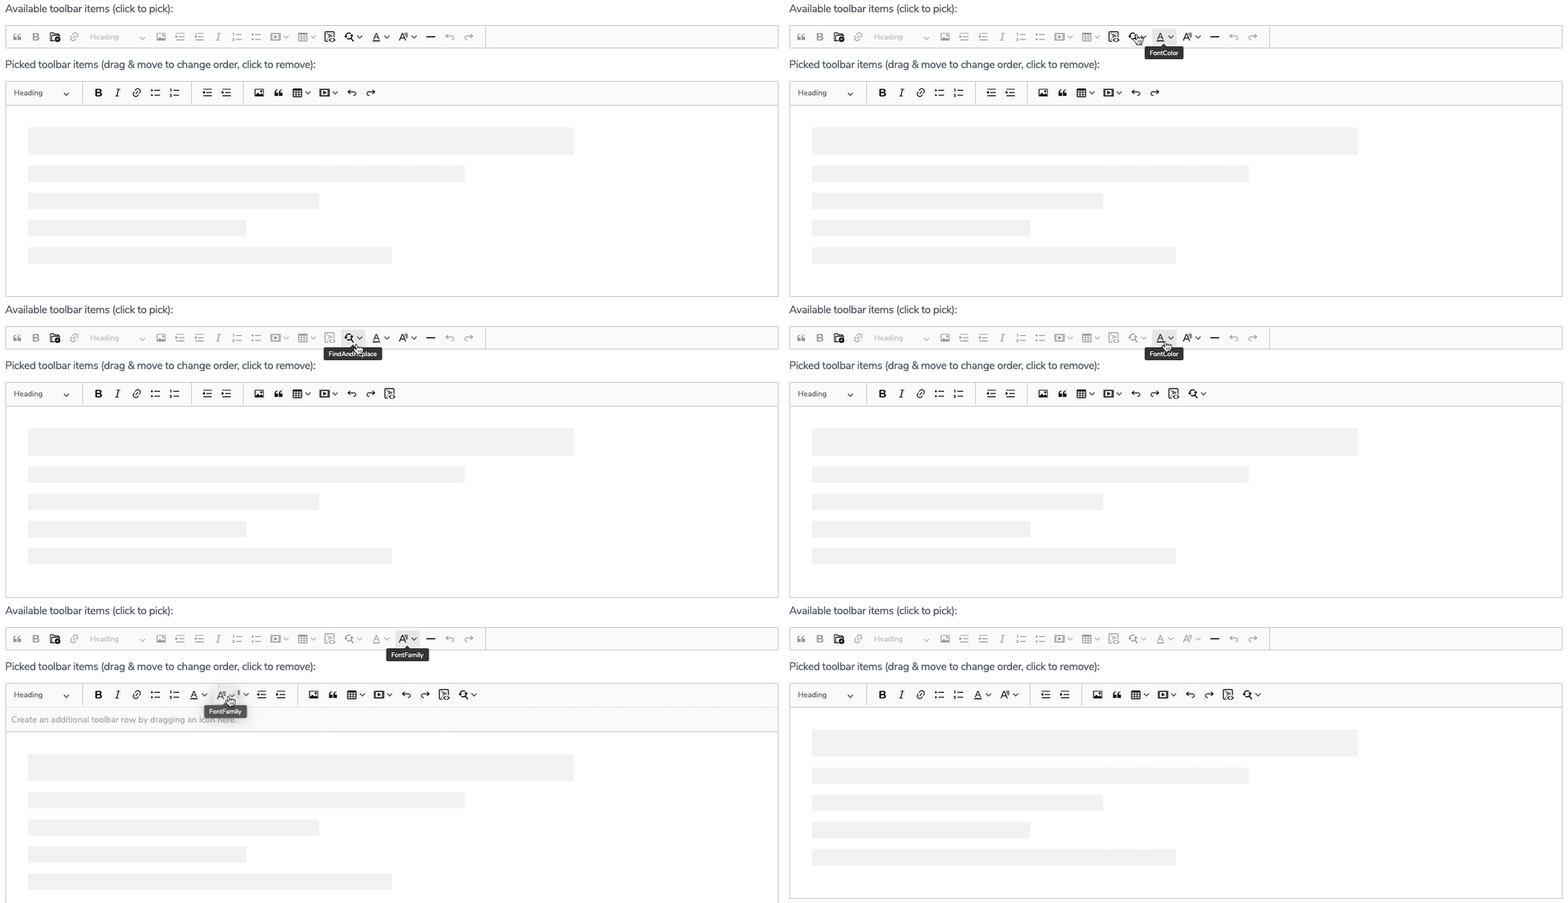
4. จัดเมนูใน Toolbar ตามใจชอบ โดยลากเมนูมาวางหรือเปลี่ยนตำแหน่ง เสร็จแล้วกดปุ่ม Next step
5. เลือกภาษา เสร็จแล้วกดปุ่ม Next step
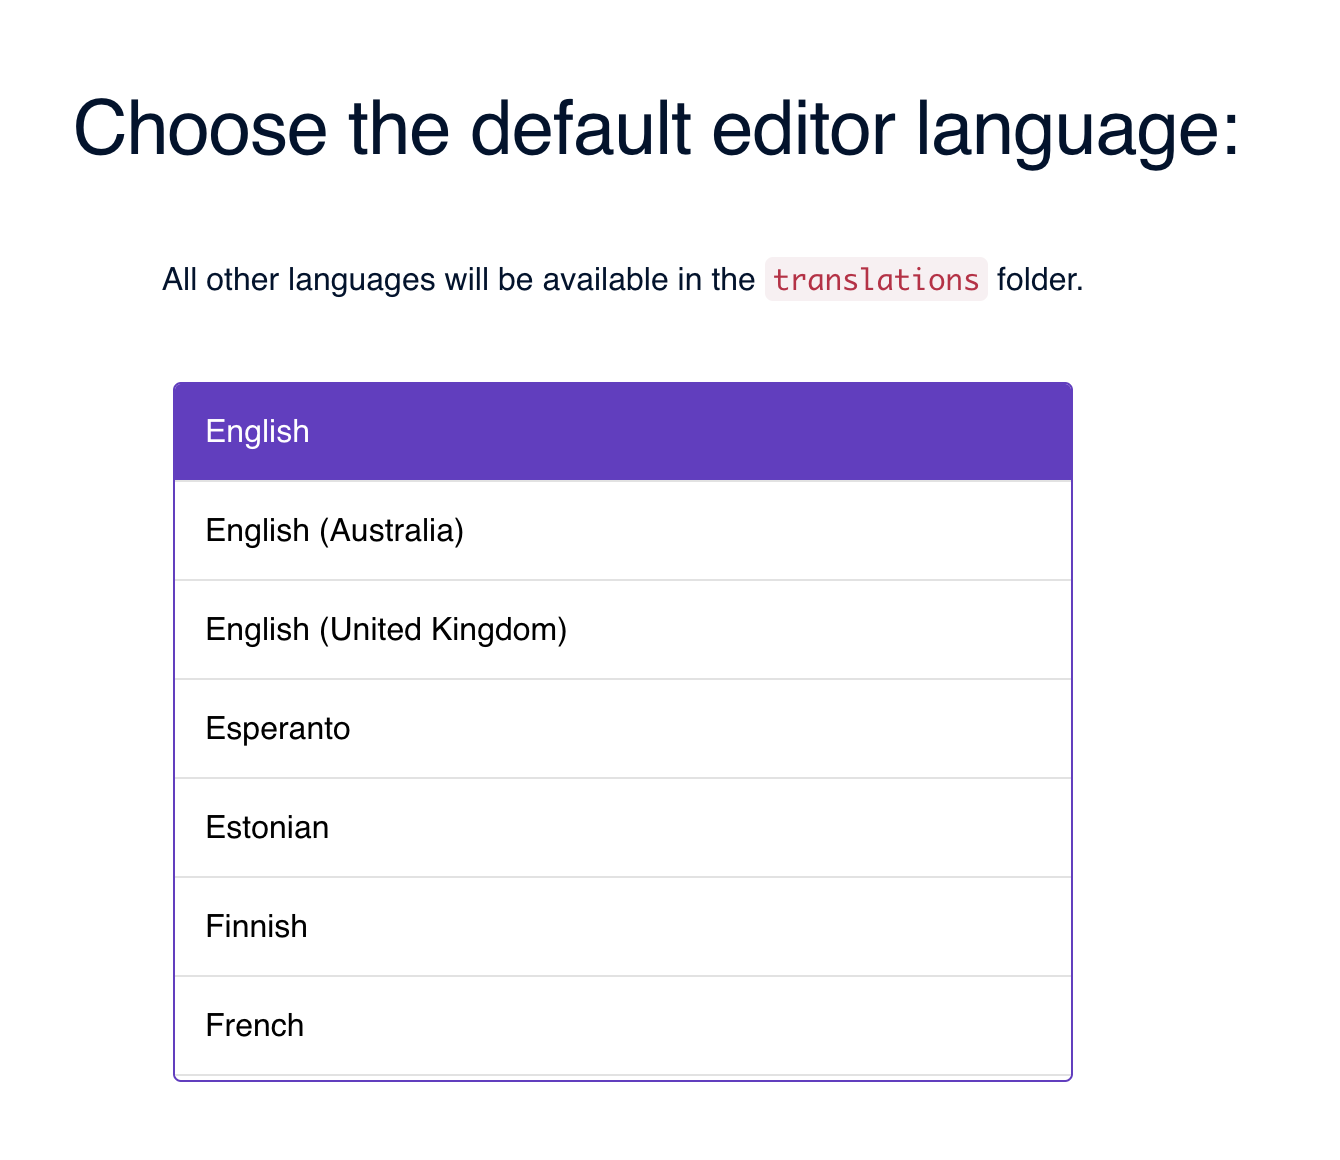
6. กดปุ่ม Start รอจน build เสร็จจะมีปุ่ม Download CKEditor 5 build ปรากฏขึ้นมา ให้กดปุ่มเพื่อดาวน์โหลดไฟล์ 

7. เมื่อดาวน์โหลดเสร็จ จะได้ไฟล์ชื่อ ckeditor5-xxx.zip ให้แตกไฟล์แล้วอัปโหลดโฟลเดอร์ของ ckeditor ที่ได้มานี้ขึ้นไปยังเซิร์ฟเวอร์ของเรา เช่นในตัวอย่างนี้คือ โฟลเดอร์ชื่อ ckeditor5-40.2.0-eeae9pw7dcm0 (ดูภาพประกอบด้านล่าง)

8. ในไฟล์หน้าเว็บของเรา ให้เพิ่ม Code 3 ส่วน เช่นเดียวกับวิธีที่ 1 และวิธีที่ 2
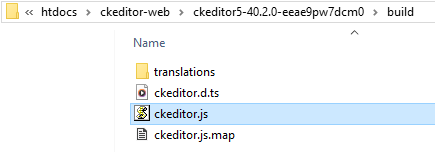
  • ที่ส่วน head ให้เรียกไฟล์ ckeditor.js จากโฟลเดอร์ที่อัปโหลดในขั้นตอนที่แล้ว ต้องใส่ Path ของไฟล์ให้ถูกต้องด้วยนะครับ
    หมายเหตุ: ถ้าทำวิธีนี้ ไฟล์ ckeditor.js จะอยู่ในโฟลเดอร์ build ดังภาพ
  • ส่วน body เพิ่ม element ที่จะแสดง CKEditor
  • เพิ่ม script สำหรับแสดง CKEditor

ตัวอย่างไฟล์หน้าเว็บแบบเต็ม ๆ

<!DOCTYPE html>
<html lang="en">
<head>
    <meta charset="utf-8">
    <title>CKEditor 5 – Classic editor build sample</title>
    <script src="ckeditor5-40.2.0-eeae9pw7dcm0/build/ckeditor.js"></script>
</head>
<body>
    <h1>Classic editor build sample</h1>
    <div id="editor">
        <p>This is some sample content.</p>
    </div>
    <script>
        ClassicEditor
            .create( document.querySelector( '#editor' ) )
            .catch( error => {
                console.error( error );
            } );
    </script>
</body>
</html>

และเมื่อลองเข้าหน้าเว็บดู จะเห็นว่ามีเมนูตามที่เราปรับแต่งไว้ ซึ่งจะมากกว่าแบบวิธีที่ 1 และวิธีที่ 2


ไม่ยากเลยใช่ไหมครับ ถึงแม้วิธีด้านบนจะเป็นตัวอย่างวิธีติดตั้ง CKEditor 5 แต่เวอร์ชันอื่นก็มีวิธีทำคล้าย ๆ กันครับ ถ้าใครอ่านแล้วงง ขอแนะนำคอร์ส Java + Web Programming (PHP101-J) ของทาง EPT ที่สอนละเอียดสุด ๆ ตั้งแต่ขั้นพื้นฐานจนทำเว็บได้เอง รับรองว่าเรียนจบ+ทำโจทย์ครบ ๆ แล้วทำได้แน่นอน แล้วพบกันใหม่บทความหน้าครับ


ที่มาและเว็บไซต์อ้างอิง

[1] https://ckeditor.com/docs/ckeditor5/latest/installation/getting-started/quick-start.html


Tag ที่น่าสนใจ: ckeditor_5 wysiwyg_editor web_development text_editor html javascript cdn online_builder custom_build programming


บทความนี้อาจจะมีที่ผิด กรุณาตรวจสอบก่อนใช้

หากมีข้อผิดพลาด/ต้องการพูดคุยเพิ่มเติมเกี่ยวกับบทความนี้ กรุณาแจ้งที่ http://m.me/Expert.Programming.Tutor

ไม่อยากอ่าน Tutorial อยากมาเรียนเลยทำอย่างไร?

สมัครเรียน ONLINE ได้ทันทีที่ https://elearn.expert-programming-tutor.com

หรือติดต่อ

085-350-7540 (DTAC)
084-88-00-255 (AIS)
026-111-618
หรือทาง EMAIL: NTPRINTF@GMAIL.COM
แผนที่ ที่ตั้งของอาคารของเรา

แผนผังการเรียนเขียนโปรแกรม

Link อื่นๆ

Allow sites to save and read cookie data.
Cookies are small pieces of data created by sites you visit. They make your online experience easier by saving browsing information. We use cookies to improve your experience on our website. By browsing this website, you agree to our use of cookies.

Copyright (c) 2013 expert-programming-tutor.com. All rights reserved. | 085-350-7540 | 084-88-00-255 | ntprintf@gmail.com

ติดต่อเราได้ที่

085-350-7540 (DTAC)
084-88-00-255 (AIS)
026-111-618
หรือทาง EMAIL: NTPRINTF@GMAIL.COM
แผนที่ ที่ตั้งของอาคารของเรา