สมัครเรียนโทร. 085-350-7540 , 084-88-00-255 , ntprintf@gmail.com

Web Programming

ASP.NET ต่างกับ ASP อย่างไร JavaScript - HelloWorld npm - Intro AngularJS - HelloWorld VueJS - HelloWorld webpack - Intro ASP.NET - HelloWorld Flask - HelloWorld Web Server คืออะไร API คืออะไร Maven - HelloWorld Nancy - HelloWorld Protocol คืออะไร วิธีติดตั้ง Web Server บน Ubuntu วิธีติดตั้ง PrestaShop with PHP 8 (ใช้ Amazon Lightsail) วิธีติดตั้ง XAMPP บน Ubuntu 22.04 วิธีติดตั้ง WordPress บน XAMPP บน Ubuntu 22.04 React - Simple Web App - People Counter React - Simple Web App - People Counter 2 React - Web App - Dictionary React - Web App - Multiple Pages React - Web App - Multiple Pages with APIs React - Web App - Calculator React - Web App - Smart Parking วิธีสร้าง AWS EC2 instance สร้าง Web Application โดยใช้ Django และ Deploy บน AWS EC2 React - Create and Run React Application React - Web App - SpO2 Tracker วิธีติดตั้งและใช้งาน CKEditor 5 Introduction to JSON JSON Full Form: JavaScript Object Notation History of JSON JSON vs XML Structure of JSON JSON Data Types JSON Objects Explained JSON Arrays Explained Key-Value Pairs in JSON JSON String Data Type JSON Number Data Type JSON Boolean Data Type JSON Null Data Type Nested JSON Objects JSON in APIs JSON Schema Overview How to Write JSON JSON File Extensions (.json) JSON Syntax Rules JSON Parsing in JavaScript JSON Stringify in JavaScript How to Use JSON.parse() How to Use JSON.stringify() Escaping Characters in JSON JSON Comments (and why they are not allowed) JSON in Web Development Sending JSON Data with HTTP Requests Receiving JSON Responses in APIs REST APIs and JSON JSON in AJAX Requests Working with JSON in Node.js How to Read a JSON File Saving Data in JSON Format How to Validate JSON JSONLint for Validation JSON Pretty Print JSON Minification JSON vs YAML JSON and JavaScript Compatibility JSON and Python Integration Working with JSON in Python (json module) JSON in Java (Jackson and GSON) JSON in C++ (RapidJSON and nlohmann/json) JSON in C# (Json.NET) JSON in PHP (json_encode and json_decode) How to Fetch JSON Data from APIs Fetching JSON in Python (requests module) Fetching JSON in JavaScript (fetch API) Fetching JSON in jQuery JSON Serialization JSON Deserialization JSON Data Interchange Common Errors in JSON Syntax Handling Large JSON Files Streaming JSON Data JSON Pagination Techniques JSON as a Configuration Format JSON in Cloud Storage JSON and MongoDB BSON vs JSON in MongoDB JSON Web Tokens (JWT) Security Considerations with JSON Cross-Origin Resource Sharing (CORS) and JSON JSON Schema Validation Creating a JSON Schema Required Fields in JSON Schema JSON Schema Property Types JSON Schema Examples Benefits of JSON Schema JSONPath: Querying JSON Data JSON Data Transformation Comparing Two JSON Objects Sorting JSON Data Flattening JSON Structures JSON Merge Techniques JSON in NoSQL Databases JSON in Relational Databases Storing JSON in MySQL JSON Functions in MySQL JSON Functions in PostgreSQL JSON Functions in SQL Server JSON and Elasticsearch Advantages of Using JSON Limitations of JSON JSON and GraphQL JSONP (JSON with Padding) JSON and Local Storage in Browsers JSON and Cookies JSON and Session Storage Importing and Exporting JSON Nested vs Flattened JSON Structures JSON Best Practices Debugging JSON Errors JSON Performance Optimization Real-Time Data with JSON Microservices and JSON JSON Versioning JSON in IoT Applications JSON for Data Exchange in Mobile Apps The Future of JSON Introduction to XML XML Full Form: eXtensible Markup Language History of XML XML vs HTML XML vs JSON Structure of XML XML Syntax Rules XML Elements Explained XML Attributes Explained XML Tags XML Prolog XML Declaration XML Namespaces XML Data Types XML Comments XML Empty Elements XML Well-Formed Documents XML Valid Documents XML DTD (Document Type Definition) XML Schema Definition (XSD) XML vs XSD XML vs DTD XML Namespaces Best Practices XML Parsers XML DOM (Document Object Model) SAX Parser in XML XML Parsing in Java XML Parsing in Python XML Parsing in C# XML Parsing in JavaScript XML with PHP How to Read XML Files How to Write XML Files How to Validate XML XML Formatting and Pretty Print XML Minification XML Tree Structure XML as a Data Interchange Format XML in Web Services SOAP and XML REST vs SOAP (XML in APIs) XML in AJAX XMLHTTPRequest in JavaScript XML in Mobile Applications How to Transform XML with XSLT XSLT for Formatting XML XPath Overview XPath Syntax XPath Expressions and Queries XML Query Languages XQuery Overview XLink for XML Linking XPointer for XML Fragment Identification XML for Configuration Files Storing XML in Databases XML in MySQL XML in PostgreSQL XML in SQL Server XML in Oracle Database XML Indexing XML Data Modeling XML and SOAP Faults XML Encryption XML Digital Signatures Security Best Practices for XML XML Schema Elements XML Schema Attributes XML Schema Validation XML Schema Restrictions and Extensions XML Schema Choice and Sequence Benefits of Using XML Limitations of XML XML in Big Data XML and NoSQL Databases XML for IoT Applications XML in E-commerce Systems XML for Document Storage XML for Multimedia Content XML in Content Management Systems XML and Microservices XML and Cloud Computing XML for RSS Feeds Atom and XML Feeds XML in Office Document Formats (DOCX, XLSX) XML and SVG (Scalable Vector Graphics) XML for Vector Graphics XML Compression Techniques XML with WebSockets XML in Real-Time Applications JSON vs XML Performance XML and CORS (Cross-Origin Resource Sharing) XML for API Design Common XML Parsing Errors Debugging XML Converting XML to JSON Converting JSON to XML XML Best Practices XML Versioning XML and GraphQL The Future of XML

A11_webpack01_Intro

webpack คืออะไร

webpack คือ static module bundler สำหรับ JavaScript Application หรือก็คือตัวรวม module ย่อยๆที่เราเขียนเข้าด้วยกันทำให้ได้ไฟล์ที่สามารถใช้งานได้จริง ถ้านึกภาพไม่ออกให้ลองดูตัวอย่างในหัวข้อต่อไปนี้ดูครับ 

ประโยชน์ของ webpack 

สมมติว่าที่บ้านเราเปิดร้านอาหารที่กำหนดให้ลูกค้าซื้อได้แค่คนละ 2 รายการเท่านั้น และร้านเราก็มียอดขายในแต่ละวันสูงมากจะต้องคิดภาษีมูลค่าเพิ่ม เราก็เลยขี้เกียจกดเครื่องคิดเลขทีละใบเสร็จ เลยตัดสินใจจะทำ Application เพื่อใช้สำหรับคำนวณภาษีมูลค่าเพิ่มจากยอดรวมของราคาอาหารสองรายการ และผลรวมของภาษีกับยอดรวมของราคาอาหาร เพื่อความสวยงามของโค้ด เราเลยจะเขียนโค้ดเป็น module ย่อยๆ ได้แก่ 

  • app.js สำหรับหน้า app หลัก
  • sum.js สำหรับคำนวณผลรวมของเลข 2 ตัว
  • tax.js สำหรับคำนวณภาษีมูลค่าเพิ่ม 7% โดยจะรับเลข 2 ตัวแล้วไปเรียก sum-calculator เพื่อคำนวณผลรวมก่อนแล้วจึงคูณด้วยค่า 0.07 เป็นภาษีออกมา

หากเขียนโค้ดตามที่เราออกแบบไว้จะได้ดังนี้
หมายเหตุ: ให้ผู้อ่านลองสร้างไฟล์ทั้ง 4 ไฟล์ใส่ไว้ในโฟลเดอร์เดียวกันนะครับ

ไฟล์ app.html
<html>
<head>
    <script src="sum.js"></script>
    <script src="tax.js"></script>
    <script src="app.js"></script>
</head>
</html>
ไฟล์ app.js
var foodPrice1 = 99;
var foodPrice2 = 129;
 
var totalVat = tax(foodPrice1, foodPrice2);
var totalPrice = sum(foodPrice1, foodPrice2);
var priceWithVat = sum(totalPrice, totalVat);
 
console.log("VAT 7% = " + totalVat);
console.log("total = " + priceWithVat);
ไฟล์ sum.js
var sum = function (a, b) {
    return a + b;
};
ไฟล์ tax.js
var tax = function (a, b) {
    var total = sum(a, b);
    return total * 0.07;
};

พอลองรันหน้าเว็บโดยดับเบิ้ลคลิกที่ไฟล์ app.html ดูจะได้ผลลัพธ์ดังนี้
หมายเหตุ: กรณี Chrome สามารถดูผลลัพธ์อย่างนี้ได้โดยคลิกขวาที่หน้าเว็บแล้วเลือก Inspect 
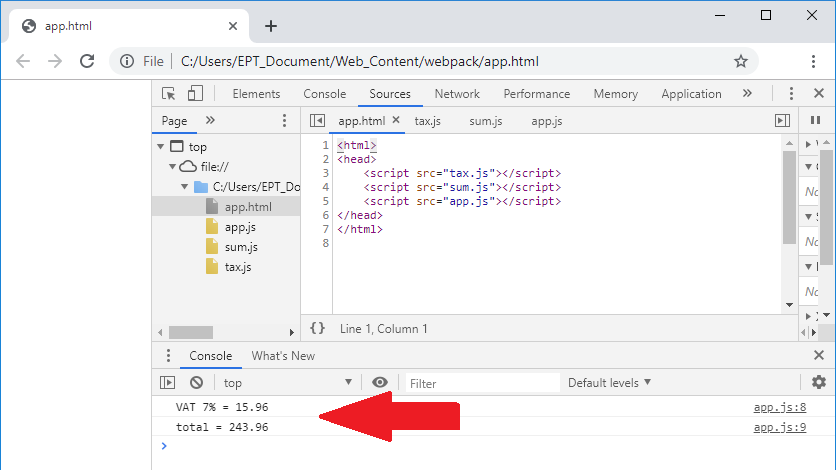
ซึ่งจะเห็นว่าใช้งานได้ถูกต้องไม่มีปัญหาอะไร แต่ๆๆๆ ถ้าเราเขียนไฟล์ app.html เป็นดังต่อไปนี้ล่ะ
***สังเกตว่าลำดับของไฟล์ที่นำเข้ามาสลับกับตอนแรก โดย sum.js มาอยู่ลำดับสุดท้าย

ไฟล์ app.html
<html>
<head>
    <script src="tax.js"></script>
    <script src="app.js"></script>
    <script src="sum.js"></script>
</head>
</html>

พอลองรันหน้าเว็บดูจะได้ผลลัพธ์ดังนี้

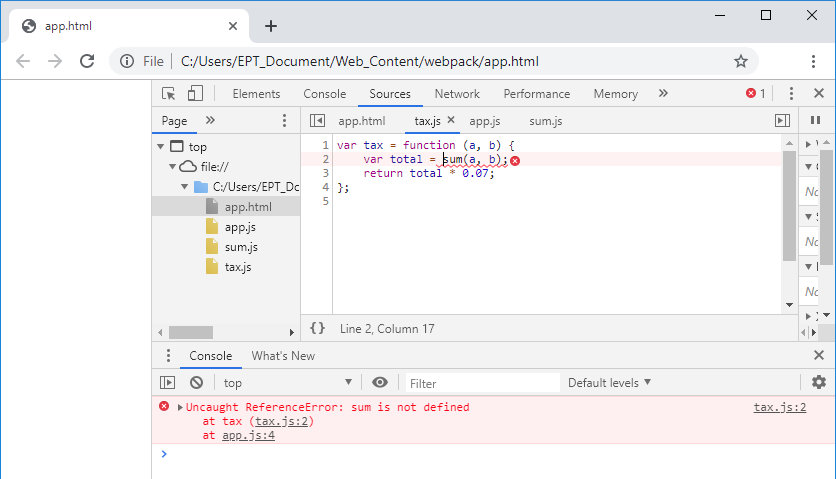
ซึ่งจะเห็นว่าเกิด Error ขึ้นเนื่องจากในบรรทัดที่ 2 ของไฟล์ tax.js ต้องการเรียกฟังก์ชัน sum() แต่มันไม่รู้จัก เนื่องจากเรา include sum.js ไว้หลังสุดนั่นเอง ตรงจุดนี้ล่ะครับที่ webpack จะมาช่วยเรา แล้วมันช่วยอย่างไรล่ะ?


ต้องขออธิบายก่อนว่าในตอนนี้การทำงานของ Application เราเป็นอย่างนี้ครับ 
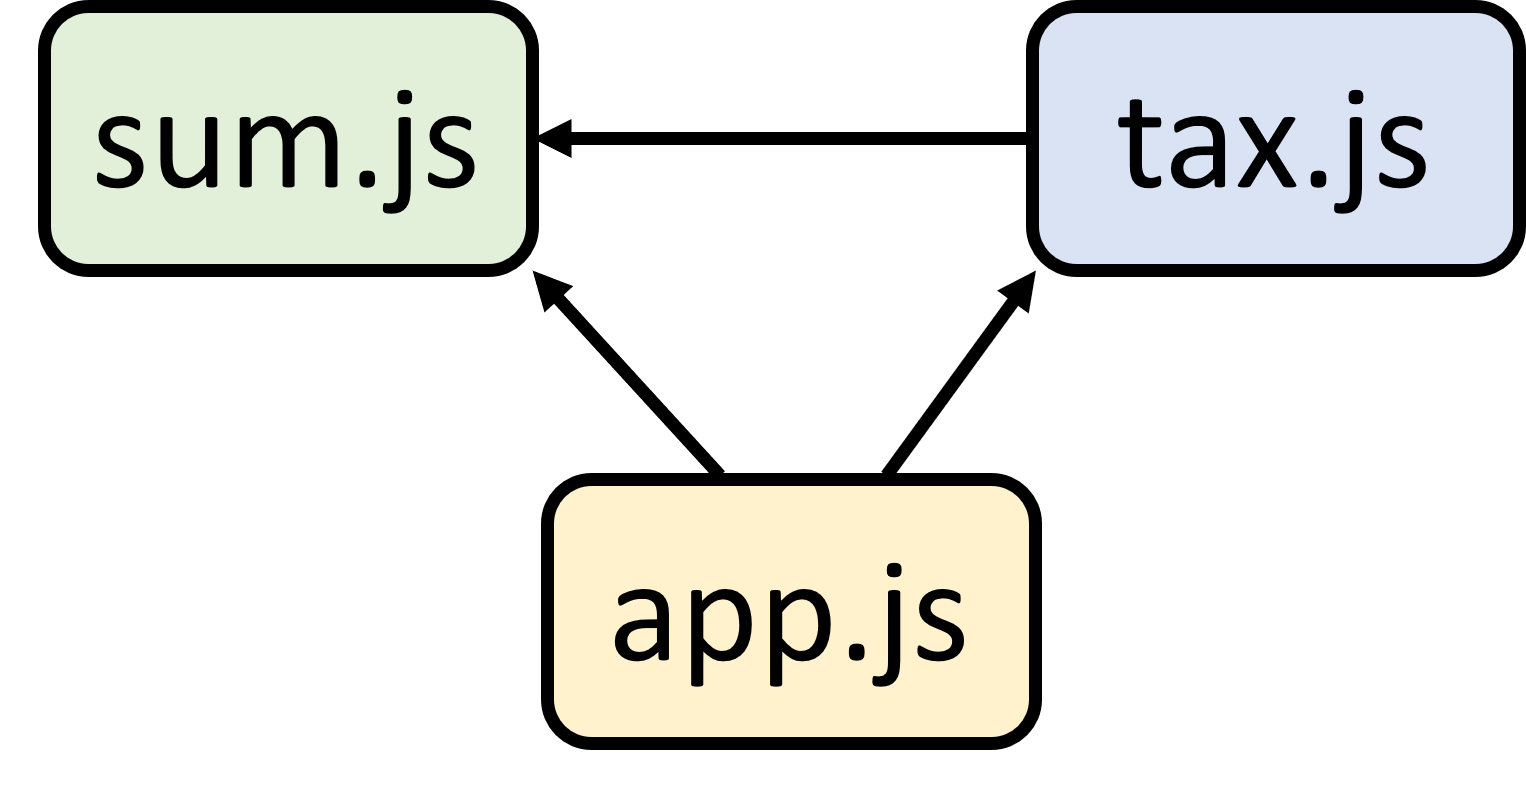
คือ app.js ไปเรียก sum.js และ tax.js ส่วน tax.js ไปเรียก sum.js ทำให้ลำดับการนำเข้าไฟล์มีผลต่อการทำงานของ Application เรา ซึ่งถ้าเราใช้ webpack มาช่วย สิ่งที่จะได้ออกมาจะเป็นอย่างนี้ครับ
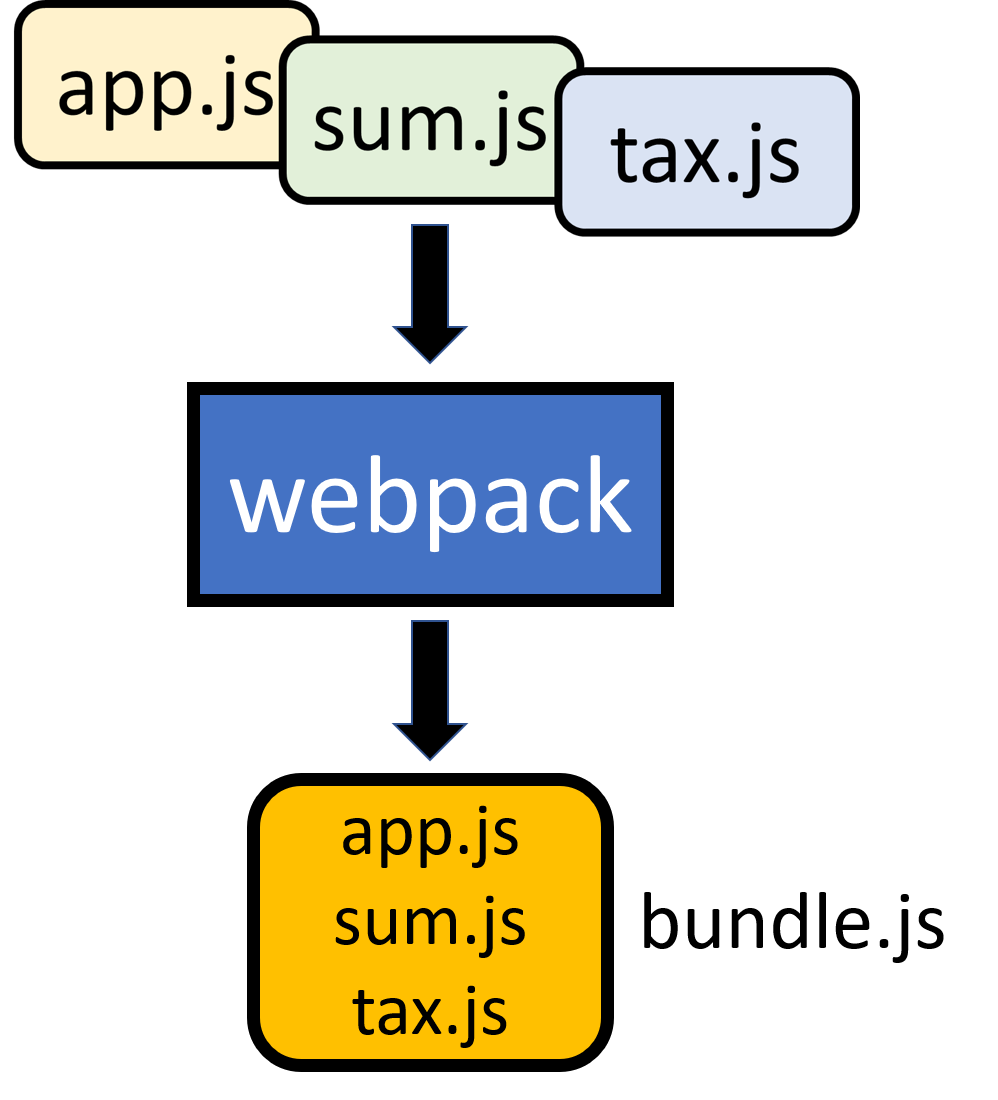
webpack จะช่วยรวม module ให้เรา ทีนี้เราก็ไม่ต้องสนใจลำดับอีกต่อไป ผู้อ่านบางคนอาจจะไม่เห็นประโยชน์ของมัน แต่เชื่อเถิดครับ ถ้าท่านทำ Application ขนาดใหญ่ มี module ย่อยเป็นสิบๆ module แล้วแต่ละ module ก็มีการเรียกอีก module หนึ่ง ถึงตอนนั้นจะเห็นปัญหาอย่างชัดแน่นอน ดังนั้นเรียนรู้ไว้ก่อนไม่เสียหายครับ ว่าแล้วก็มาลองลงมือทำกันเลยดีกว่า

มาลง webpack + ลองใช้กันเถอะ

วิธีที่ง่ายที่สุดในการลง webpack คือการใช้ npm ที่เราได้ติดตั้งผ่าน NodeJS ไปแล้วจากบทความ A07_npm01_Intro ดังนั้นในบทความนี้จะถือว่าเครื่องของเรามี npm อยู่แล้วนะครับ ใครยังไม่มีก็ย้อนไปอ่านบทความก่อนๆดูนะครับ

1. เปิด Command Prompt ขึ้นมา แล้วพิมพ์คำสั่ง cd  แล้วตามด้วย path ที่ต้องการ เพื่อไปยัง directory ที่เราต้องการลง webpack ในที่นี้จะลงในโฟลเดอร์ชื่อ webpack_demo (จริงๆมีวิธีลงแบบ global แต่จะไม่แนะนำให้ทำครับ)

2. พิมพ์คำสั่ง 3 คำสั่งต่อไปนี้ทีละคำสั่งเพื่อทำการติดตั้ง webpack แบบ local (หมายถึงติดตั้งแค่ใน directory ที่เราต้องการ)

npm init -y
npm install webpack --save-dev
npm install webpack-cli --save-dev

3. รอจนติดตั้งเสร็จ จะเห็นข้อความเตือนดังนี้ ยังไม่ต้องสนใจครับ และอย่าเพิ่งปิดหน้าต่าง Command Prompt นี้นะครับ
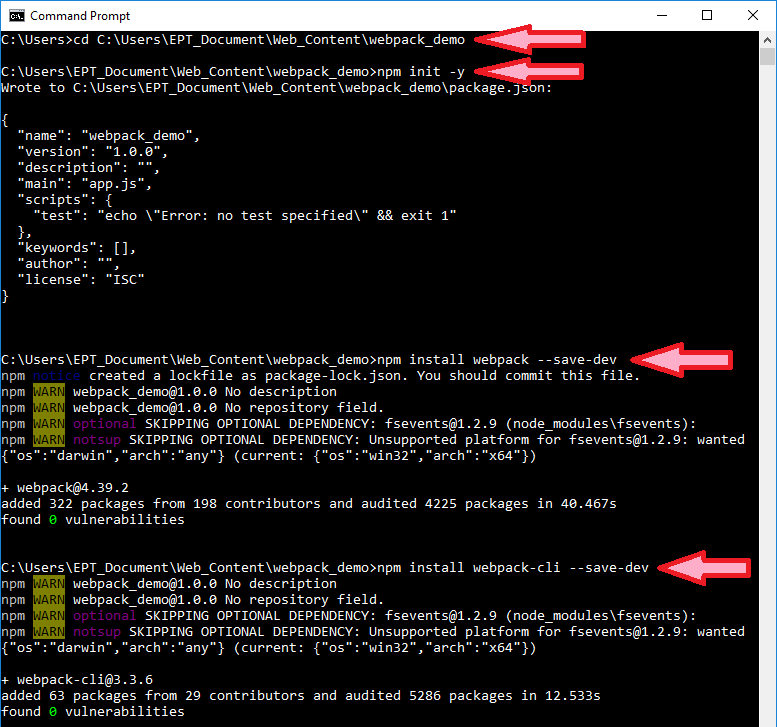
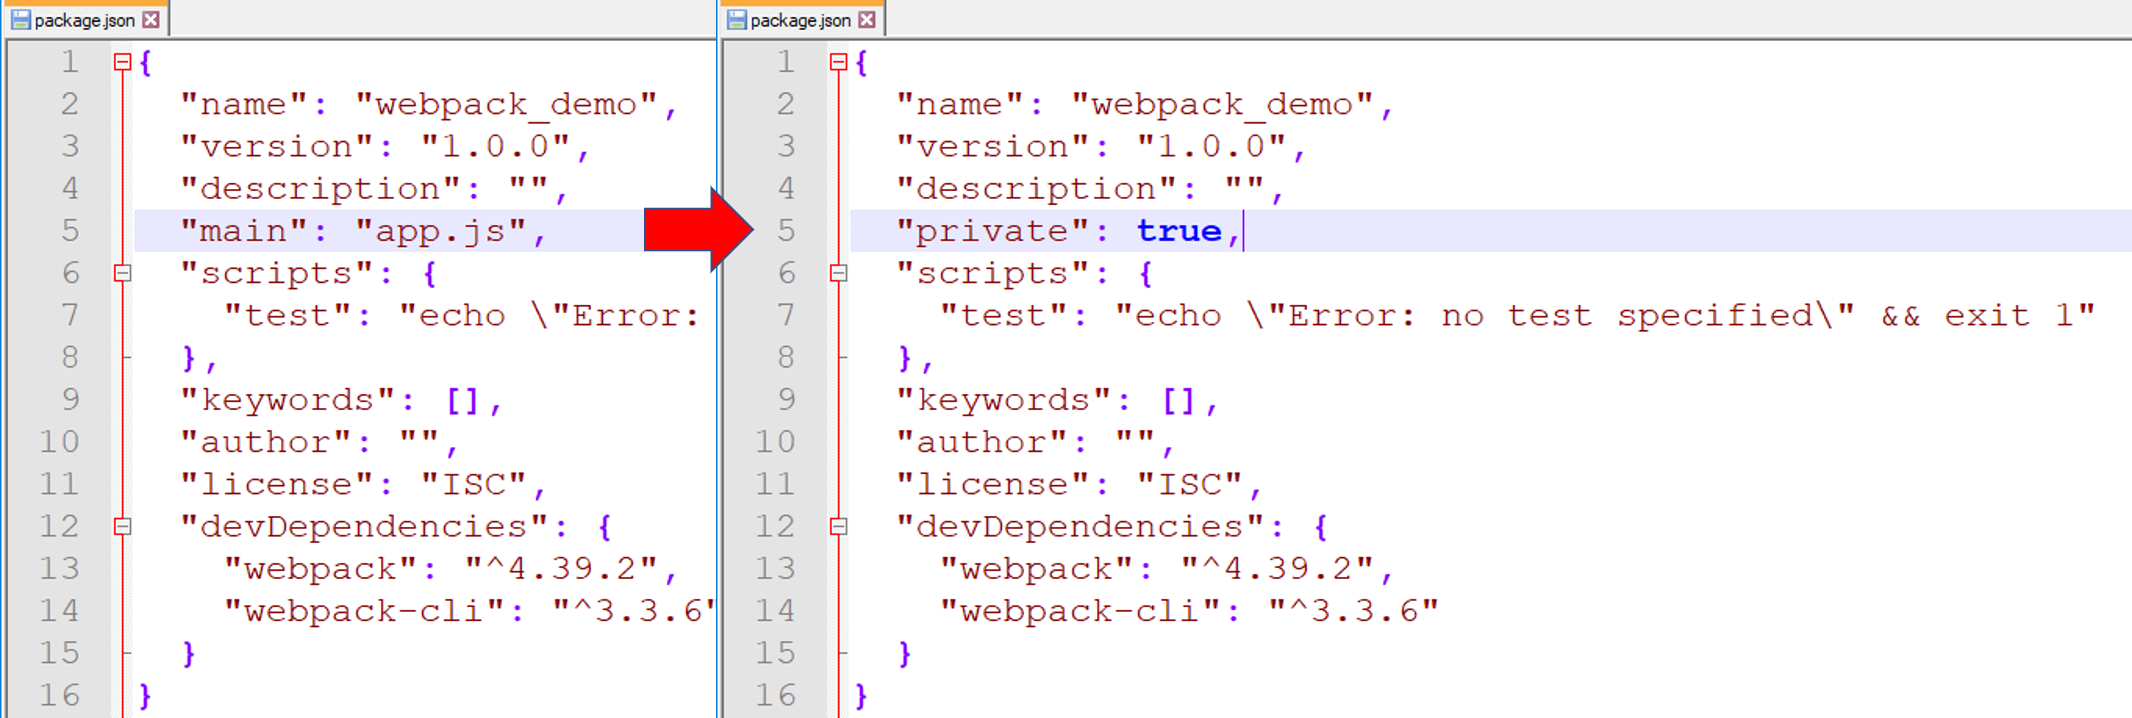
4. หลังจากติดตั้ง webpack เสร็จแล้ว จะเห็นว่าในโฟลเดอร์ webpack_demo มีไฟล์ชื่อ package.json ให้แก้บรรทัด "main": "app.js", เป็น "private": true, เพื่อป้องกันเรา public โค้ดโดยไม่รู้ตัว
5. คราวนี้เราจะมาจัดโฟลเดอร์ไฟล์ที่เราเขียนไว้จากตัวอย่างที่แล้วเพื่อเตรียมสำหรับการ bundle โดยให้สร้างโฟลเดอร์ชื่อ dist และ src เพิ่มไว้ในโฟลเดอร์ที่กำหนดในขั้นตอนที่ 1 (ในตัวอย่างนี้คือโฟลเดอร์ชื่อ webpack_demo) แล้วแก้ชื่อไฟล์จาก app.html เป็น index.html และชื่อไฟล์ app.js เป็น index.js จากนั้นจัดไฟล์เข้าโฟลเดอร์ตามนี้

หมายเหตุ: ขั้นตอนนี้สำคัญมาก ต้องใช้ชื่อและ path ตามนี้เป๊ะๆนะครับ! เนื่องจากตั้งแต่ webpack 4 เป็นต้นมา เราไม่จำเป็นต้องใช้ config file แล้ว ดังนั้นเราสามารถทำให้ webpack ทำงานได้ง่ายๆถ้ามี src/index.js

  webpack_demo
  |- package.json
  |- /dist
    |- index.html
  |- /src
    |- index.js
    |- sum.js
    |- tax.js

6. แก้ไฟล์ index.html ให้เรียกแค่ main.js ซึ่งเป็นไฟล์ output ที่จะได้ออกมาหลังจาก bundle เสร็จ นอกจากนั้นก็แก้ไฟล์อื่นๆตามนี้ครับ

ไฟล์ index.html
<html>
<head>
    <script src="main.js"></script>
</head>
</html>
ไฟล์ index.js
import sum from '../src/sum';
import tax from '../src/tax';
 
var foodPrice1 = 99;
var foodPrice2 = 129;
 
var totalPrice = sum(foodPrice1, foodPrice2);
var totalVat = tax(foodPrice1, foodPrice2);
var priceWithVat = sum(totalPrice, totalVat);
 
console.log("VAT 7% = " + totalVat);
console.log("total = " + priceWithVat);
ไฟล์ sum.js
export default function sum(a, b) {
    return a + b;
};
ไฟล์ tax.js
import sum from '../src/sum';
 
export default function tax(a, b) {
    var total = sum(a, b);
    return total * 0.07;
};

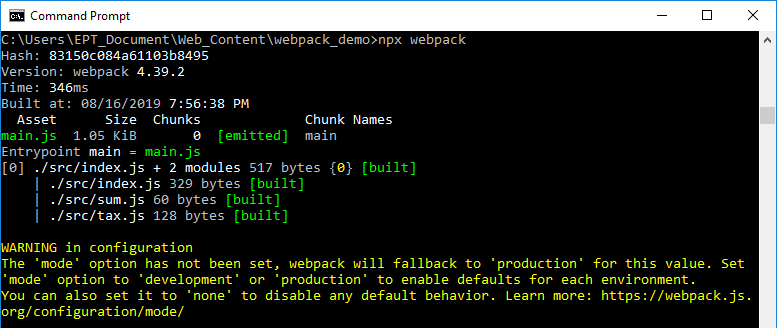
7. กลับไปที่ Command Prompt แล้วพิมพ์คำสั่ง 

npx webpack

หมายเหตุ: เมื่อพิมพ์คำสั่งนี้โดยไม่มี config file webpack จะทำงานโดยถือว่า src/index.js เป็น Entry point และจะ generate dist/main.js เป็น output ออกมาให้

8. รอจน build เสร็จ จะขึ้นข้อความแบบนี้ แสดงให้เห็นว่ามันสร้างไฟล์ main.js ให้เราไว้ที่โฟลเดอร์ dist เรียบร้อยแล้วครับ (ไม่ต้องสนใจตรงส่วน WARNING ครับ)
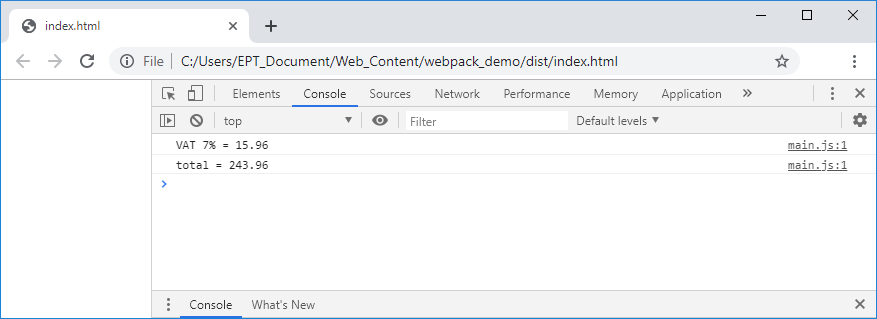
9. ลองดับเบิ้ลคลิกไฟล์ index.html ดู จะได้ผลลัพธ์ตามที่เราต้องการแล้วครับ เย้ๆๆๆ
จบแล้วครับสำหรับเรื่อง Intro to webpack อย่างย่อๆ อาจจะงงๆหน่อยแต่ค่อยๆทำตามทีละขั้น รับรองว่าทำได้แน่นอนครับ

สุดท้ายนี้ถ้าผู้อ่านอยากเรียนรู้เรื่อง JavaScript และเรื่องเกี่ยวกับ Web Programming อย่างลึกซึ้งก็ขอแนะนำคอร์ส Web Programming ของทาง EPT ครับ สามารถดูรายละเอียดคอร์สได้โดยคลิกที่นี่ หรือติดต่อได้ที่ 085-350-7540

แล้วพบกันใหม่บทความหน้าครับ
 

ที่มาและเว็บไซต์อ้างอิง

[1] https://webpack.js.org/
[2] https://webpack.js.org/guides/getting-started/


Tag ที่น่าสนใจ: webpack static_module_bundler javascript module_bundling web_development programming module_loading application_development front-end_development javascript_bundler webpack_configuration


บทความนี้อาจจะมีที่ผิด กรุณาตรวจสอบก่อนใช้

หากมีข้อผิดพลาด/ต้องการพูดคุยเพิ่มเติมเกี่ยวกับบทความนี้ กรุณาแจ้งที่ http://m.me/Expert.Programming.Tutor

ไม่อยากอ่าน Tutorial อยากมาเรียนเลยทำอย่างไร?

สมัครเรียน ONLINE ได้ทันทีที่ https://elearn.expert-programming-tutor.com

หรือติดต่อ

085-350-7540 (DTAC)
084-88-00-255 (AIS)
026-111-618
หรือทาง EMAIL: NTPRINTF@GMAIL.COM
แผนที่ ที่ตั้งของอาคารของเรา

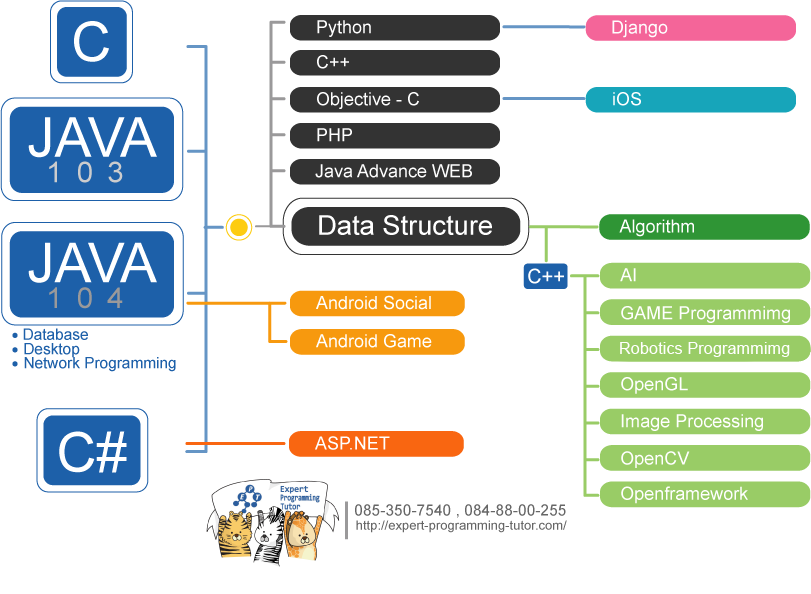
แผนผังการเรียนเขียนโปรแกรม

Link อื่นๆ

Allow sites to save and read cookie data.
Cookies are small pieces of data created by sites you visit. They make your online experience easier by saving browsing information. We use cookies to improve your experience on our website. By browsing this website, you agree to our use of cookies.

Copyright (c) 2013 expert-programming-tutor.com. All rights reserved. | 085-350-7540 | 084-88-00-255 | ntprintf@gmail.com

ติดต่อเราได้ที่

085-350-7540 (DTAC)
084-88-00-255 (AIS)
026-111-618
หรือทาง EMAIL: NTPRINTF@GMAIL.COM
แผนที่ ที่ตั้งของอาคารของเรา